



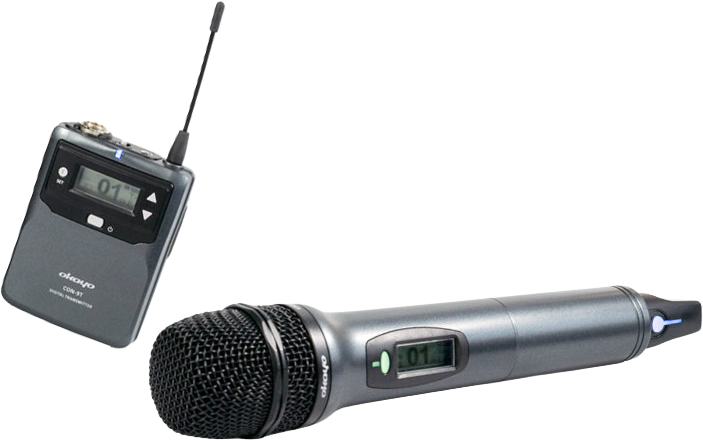
Okayo CON-9
Instructions
Accessory Operating Instructions

Okayo CON-9H
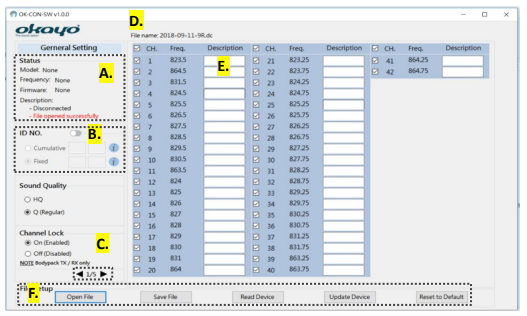
Okayo OK-CON-SW
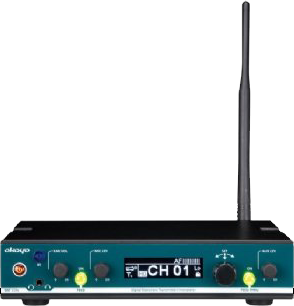
Okayo DST-CON
General Instructions
1. Before Starting the Tour Guide System
- Ensure that a microphone or headset is connected to the transmitter and an earphone to the receiver. Check that the microphone/headset/earphone plug is properly inserted into the socket.
- Ensure that disposable batteries or charged Ni-MH rechargeable batteries have been correctly inserted into each device (+ to +, - to -). For systems with built-in batteries, check the charge level.
2. Proper Tour Guide System Startup
- Start by turning on the transmitter (or transmitters in systems that allow more than one transmitter to operate on the same channel) and selecting the desired transmission channel.
⚠ Warning
Most popular tour guide systems allow only one transmitter per channel. Operating two transmitters on the same channel will cause interference or transmission failure.
- If the transmitter has a microphone sensitivity adjustment setting, check that it is not set too low. This also applies to the "mute" function.
- Next, turn on all receivers. Set the transmission channel manually or via channel synchronization (if available on the model) to match the transmitter's channel.
- Check that the volume on the receivers is not set too low.
3. Tour Guide System Power Management
3.1. Disposable Batteries
- One battery bar on the display or a red LED on the device indicates low battery level. At this point, replace the batteries with new ones, as the device will operate for a maximum of 1 hour.
- If batteries discharge too quickly, insert new ones and check their operating time, or try batteries from a different manufacturer.
- Low or high temperatures may affect battery operating time.
3.2. Rechargeable and Built-in Batteries
- One battery bar on the display or a red LED on the device indicates low battery level. At this point, place the device in the charger (if the device has a micro USB port, it can be charged using a USB cable).
- Devices with rechargeable batteries should be charged one day or several hours before planned use.
- Charging time for rechargeable batteries in a dedicated charger depends on the model and degree of discharge. For a completely discharged battery, charging time ranges from approximately 5 hours to 12 hours for the highest-capacity batteries. Leaving devices in the charger overnight does not cause overcharging or any equipment damage.
- Remember to periodically replace worn rechargeable batteries with new ones. Depending on the manufacturer and battery capacity, cycles (cyclic discharge and recharge) can range from 500 to 1,500.
⚠ Warning
Connecting more than one charger to an extension cord is not recommended.
4. Transmission Interference/No Transmission - Possible Solutions
- Check whether the transmitter/receiver is turned on.
- Check whether the transmitter and receiver are on the same channel.
- Check whether the transmitter/receiver is muted.
- Check whether two transmitters are operating on the same channel.
- Check transmission quality on another channel.
- Check whether the microphone/earphones are damaged – test the receiver with an earphone and the transmitter with a microphone that you know work correctly.
- Check whether the battery is discharged – test the device with a battery/rechargeable battery that works in another device (you are certain it is not discharged).
- Restart the tour guide system (turn off and on again).
Okayo CON-9 User Manual
1. Device Description
1.1. CON-9T Transmitter
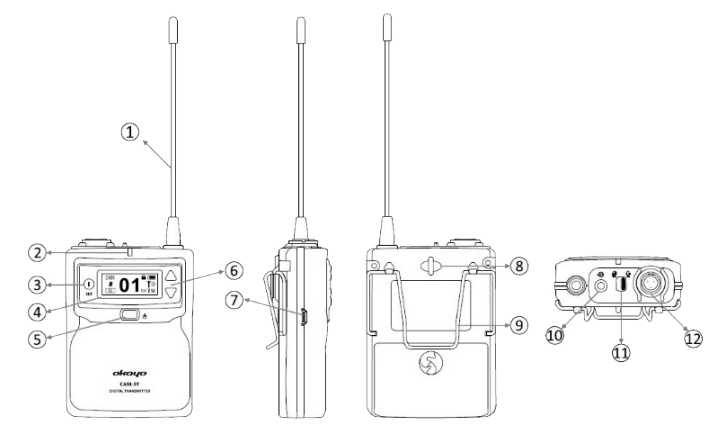
- Flexible Antenna
- LED Indicator
- SET Button
- Backlit LCD Display
- Power Button
- Up/Down Buttons
- USB Port (charging with rechargeable batteries)
- Lanyard Attachment
- Belt Clip
- Audio Input Socket
- Talk/Mute Switch
- Mini Jack XLR Microphone Socket
1.2. CON-9R Receiver
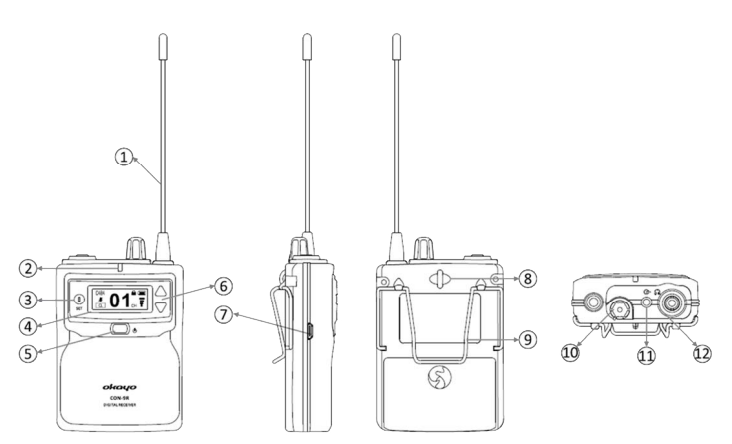
- Flexible Antenna
- LED Indicator
- SET Button
- Backlit LCD Display
- Power Button
- Up/Down Buttons
- USB Port (charging with rechargeable batteries)
- Lanyard Attachment
- Belt Clip
- Volume Control
- Audio Output Socket
- 3.5 mm Jack Earphone Socket
2. Display
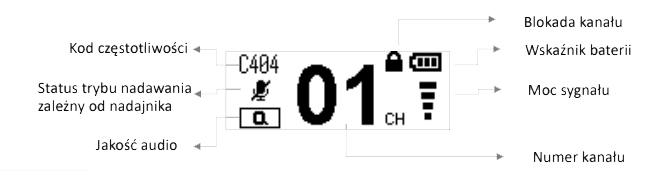
2.1. Transmitter
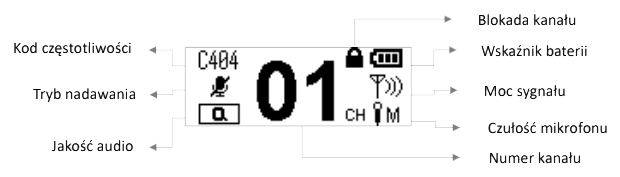
2.2. Transmitter
3. General Operating Principles and Functions
3.1. Power On
Press and hold the power button for approximately 3 seconds to turn on the device.
3.2. Channel Selection
Press and hold the up and down buttons simultaneously for approximately 3 seconds. The channel lock will be released. The screen will light up and the channel number will start flashing. At this point, use the up/down buttons to select the desired channel. Confirm the selected channel by pressing the SET button.
3.3. Check Channel Frequency
Press the SET button. The frequency of the channel will be displayed on the screen. The device will automatically return to the main screen after 3 seconds.
3.4. Power Off
Press and hold the power button for approximately 3 seconds to turn off the device.
3.5. USB Port
Charging: Connect the USB cable to the turned-off device to charge it.
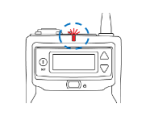
Red LED: Charging
Blue LED: Charged
Power Supply: Connect the USB cable to the turned-on device to maintain power. The  symbol will appear on the screen.
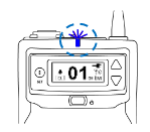
Blue LED indicates proper device power supply.
⚠ Warning
Before charging, ensure that rechargeable batteries are in the device!
4. Settings Panel
4.1. Accessing the Settings Panel
- Press and hold the SET and power buttons simultaneously to turn on the device.
- The settings panel will appear on the screen, allowing you to customize options to your preferences.
- Use the up/down buttons to scroll through available settings. See the panel below.
- Press the SET button to enter the desired setting. Use the up/down buttons to select a specific configuration and confirm by pressing the SET button.
- To exit the settings panel, use the up/down buttons to find the "exit" option on the screen and press the SET button. The device will start automatically.
CON9-T (Transmitter)
| Parameter | Setting |
|---|---|
| Quality |
Transmitter transmission quality. ① HQ: Enhanced ② Q (default): Standard Number of channels limited for HQ option. |
| Lock |
Automatic channel lock ① ON (default): Enabled ② OFF: Disabled |
| RF Power (transmitter power) |
Handheld transmitter power limits are officially defined and vary by country. ① HIGH ( ② LOW ( |
| Mic Gain |
① HIGH ( ② MID ( ③ LOW ( |
| Auto PWR-ON |
The transmitter will start automatically after leaving the charger (applies to CHG-24). ① ON: Enabled ② OFF (default): Disabled |
| Exit |
Exit |
 ) (default): Longer range
 ): Shorter range
 ) HIGH
 ) (default) MEDIUM
 ) LOW
) LOWCON9-R (Receiver)
| Parameter | Setting |
|---|---|
| Quality |
Transmitter transmission quality. ① HQ: Enhanced ② Q (default): Standard Number of channels limited for HQ option. |
| Lock |
Automatic channel lock ① ON (default): Enabled ② OFF: Disabled |
| Squelch |
This option affects signal quality. The better the quality, the shorter the range. ① HIGH: Highest quality, shorter range ② LOW (default): Standard quality, longer range |
| Audio Volume |
This option affects the volume of the audio output socket. ① HIGH High ② MID (default) Medium ③ LOW Low |
| Auto PWR-ON |
The transmitter will start automatically after leaving the charger (applies to CHG-24). ① ON: Enabled ② OFF (default): Disabled |
| Auto PWR-OFF |
The receiver will turn off automatically if it does not receive a signal for 20 minutes. ① ON (default) Enabled ② OFF Disabled |
| Exit |
Exit |
4.2. Restore Factory Settings (Default)
- Press and hold the up, down, and power buttons simultaneously for approximately 3 seconds.
- The device will automatically return to factory settings.
- Default settings list for CON-9T:
Channel number: 01
Quality: Q
Lock: ON
RF Power: HIGH
Mic Gain: MID
Auto PWR-ON: OFF - Default settings list for CON-9R:
Channel number: 01
Quality: Q
Lock: ON
Squelch: LOW
Audio Volume: MID
Auto PWR-ON: OFF
Auto PWR-OFF: ON
⚠ Warning
Restoring factory settings will also delete changes made using OK-CON-SW software.
Okayo CON-9H — Wireless Microphone
1. Device Diagram
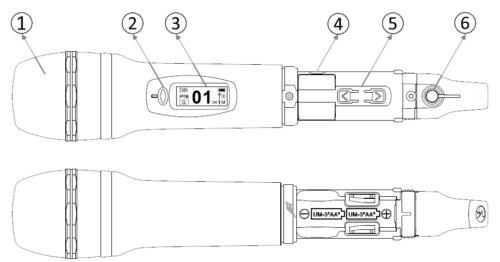
- Dynamic Capsule
- Talk/Mute Button (Green: talk, Red: muted)
- Backlit LCD Display
- USB Port (charging possible with rechargeable batteries)
- Up/Down Button
- Power Button (Blue: Sufficient battery level, Red: Low battery level)
⚠ Warning
Buttons 4 and 5 are accessible after unscrewing the lower part of the housing.
2. Display
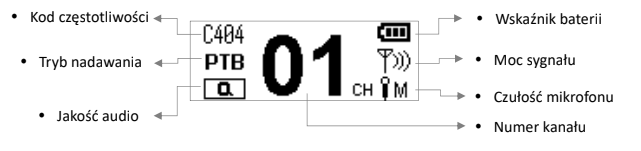
3. General Operating Principles and Functions
3.1. Power On
Press and hold the power button for approximately 3 seconds to turn on the microphone.
3.2. Channel Selection
Press and hold the up and down buttons simultaneously for approximately 3 seconds. The screen will light up and the channel number will start flashing. At this point, use the up/down buttons to select the desired channel. The selected channel will be confirmed automatically after 3 seconds.
3.3. Check Channel Frequency
Press the up or down button. The frequency of the channel will be displayed on the screen. The microphone will automatically return to the main screen after 3 seconds.
3.4. Power Off
Press and hold the power button for approximately 3 seconds to turn off the microphone.
3.5. USB Port
Charging: Connect the USB cable to the turned-off microphone to charge it.
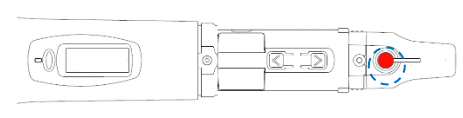
Red: Charging
Blue: Charged
Power Supply: Connect the USB cable to the turned-on microphone to maintain power. The symbol will appear on the screen.
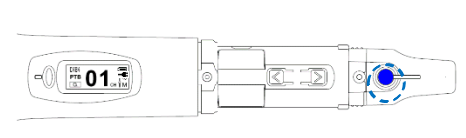
Blue indicates proper microphone power supply.
⚠ Warning
Before charging, ensure that rechargeable batteries are in the device!
4. Settings Panel
4.1. Accessing the Settings Panel
- Press and hold the up and power buttons simultaneously to turn on the microphone.
- The settings panel will appear on the screen, allowing you to customize options to your preferences.
- Use the up/down buttons to scroll through available settings. See the panel below.
- Press the power button to enter the desired setting. Use the up/down buttons to select a specific configuration and confirm by pressing the power button.
- To exit the settings panel, use the up/down buttons to find the "exit" option on the screen and press the power button. The microphone will start automatically.
| Parameter | Setting |
|---|---|
| QUALITY |
Microphone transmission quality. ① HQ: Enhanced ② Q (default): Standard Number of channels limited for HQ option. |
| TALK MODE |
① PTB (default): Press to talk/mute ② PTT: Press and hold to talk ③ PTM: Press and hold to mute |
| RF POWER (transmitter power) |
Handheld transmitter power limits are officially defined and vary by country. ① HIGH ( ② LOW ( |
| MIC GAIN |
① HIGH ( ② MID ( ③ LOW ( |
| EXIT |
Exit |
 ) (default): Longer range
 ): Shorter range
 ) HIGH
 ) (default) MEDIUM
 ) LOW
) LOW4.2. Restore Factory Settings (Default)
- Press and hold the up, down, and power buttons simultaneously for approximately 3 seconds.
- The microphone will automatically return to factory settings.
- Default settings list for CON-9H:
Channel number: 01
Quality: Q
Talk Mode: PTB
RF Power: HIGH
Mic Gain: MID
⚠ Warning
Restoring factory settings will also delete changes made using OK-CON-SW software.
Okayo OK-CON-SW — Software
1. System Requirements
OS: Microsoft Windows 10 or newer: 32/64 bit or newer
CPU: Intel ® Core TM i3 or newer
RAM: 2GB RAM or higher
Screen Resolution: 1280 x 720 or higher
2. System Configuration Before Programming
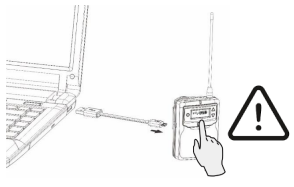
CON-9T/H/R: A micro-USB to USB-A programming cable is required. Enter the device programming mode by pressing the power button on the CON-9 after connecting to the computer.
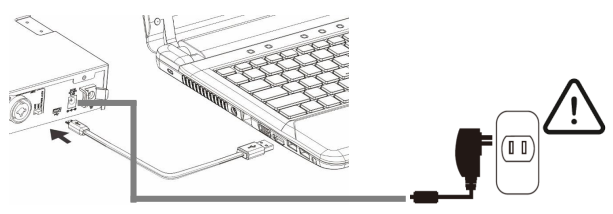
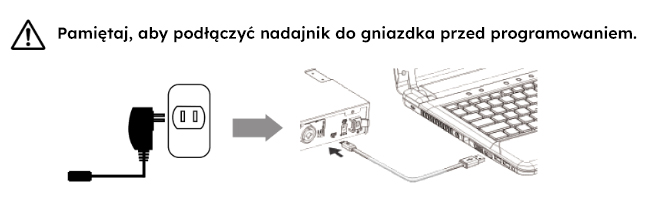
DST-CON(-D) Stationary Transmitter: A micro-USB to USB-A programming cable is required. Ensure that the stationary transmitter is connected to power during programming.
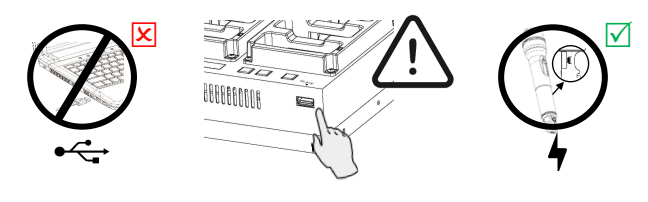
CHG-24 Charger: NOT AVAILABLE. The USB-A port on the CHG-24 is for microphone charging only. Do not connect it to a computer for programming.
3. Install OK-CON-SW on Your Computer
STEP 1
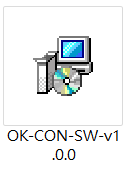
Double-click the OK-CON-SW installation file to begin.
STEP 2
Click next to continue.
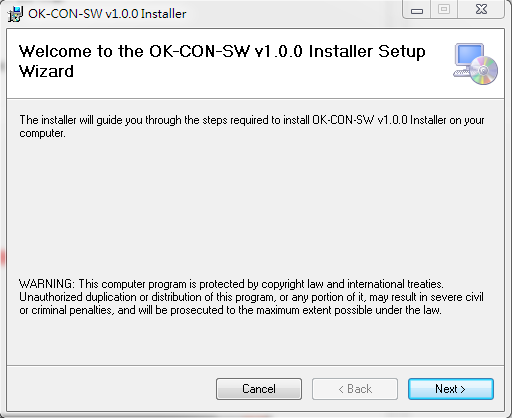
STEP 3
Define the saved folder on your computer and click next to continue.
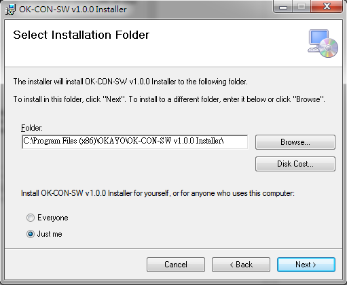
STEP 4
Enter the authorized serial number and click next to continue.
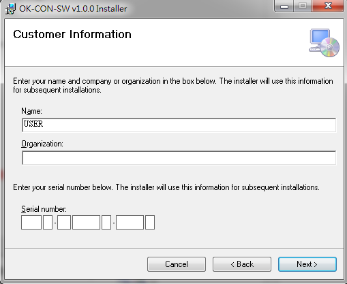
STEP 5
Click next to begin installation.
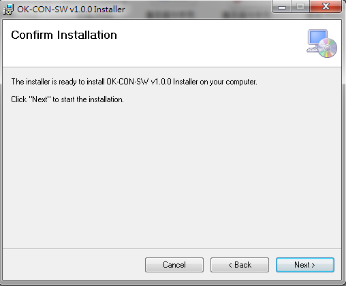
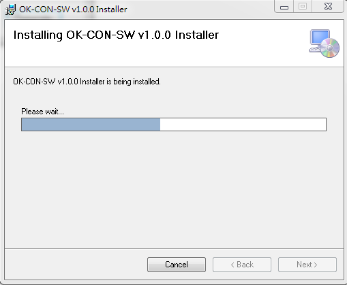
STEP 6
Installation is in progress.
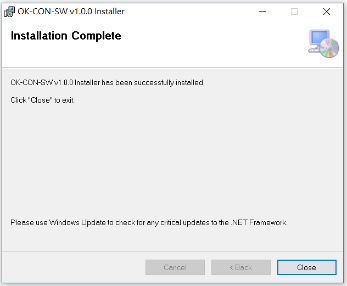
STEP 7
Click close to complete installation.
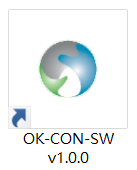
STEP 8
The proprietary OK-CON-SW software is ready.
4. Software Interface
A. Connected device status.
B. Individual ID numbers N1: Two (2) ID numbers can be configured.
- Cumulative ID: Each time the Update Device button is pressed, the number increases by 1. Ideal for tour operators and equipment rental market.
- Fixed ID: Numbers remain unchanged after pressing the Update Device button. Ideal for hearing support/audio description sector.
C. Various device settings are available. Click ►to check and adjust settings.
• CON-9R Receiver

• CON-9R Receiver

• CON-9T Transmitter

• CON-9H Microphone

*PTB – Press to enable microphone, press again to mute microphone.
**PTT – Press and hold button to talk.
***PTM – Press and hold button to mute microphone.
D. Only selected channels (✔) will appear on devices.
E. Compile custom channel name according to preferences.
F. File Configuration
- Open File: Open previously saved file (.dt).
- Save File: Save current device settings and channels (.dt).
- Read Device: Read connected device.
- Update Device: Update device settings and channels on connected device.
- Reset to Default: All device settings, except ID number, will be reset to default values N2.
N1 A maximum of 4 characters can be defined as an ID number. Below are its rules.
- First 2 characters: Letters or numbers.
- Last 2 characters: Numbers only.
- For Cumulative ID, only the numbers in the last 2 characters are increased.
N2 The Update Device button must be clicked after clicking the Reset to Default button.
5. Troubleshooting
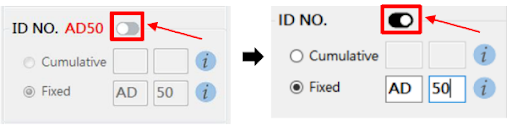
Why can't I compile ID numbers?
Enable this setting as shown below to begin compilation.
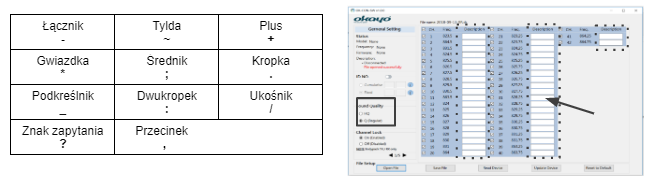
Why can't I change channel names?
- Ensure that you have selected "Q" audio quality.
- Character length varies by language.
- Only the punctuation marks listed below are allowed.
Okayo DST-CON — Stationary Transmitter
1. Interface
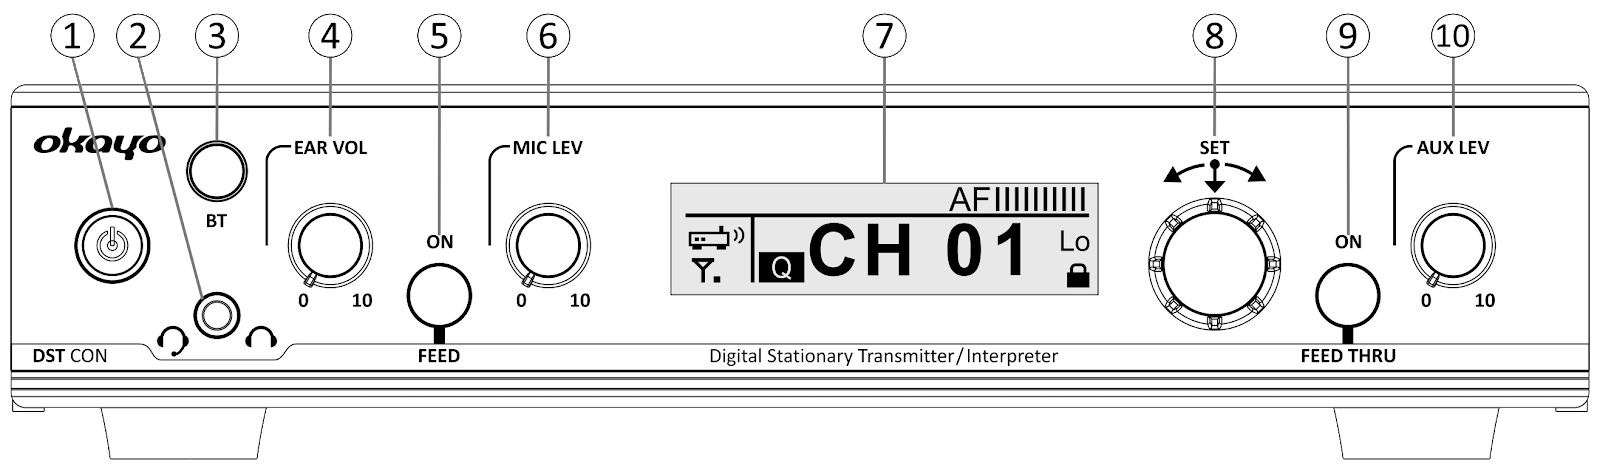
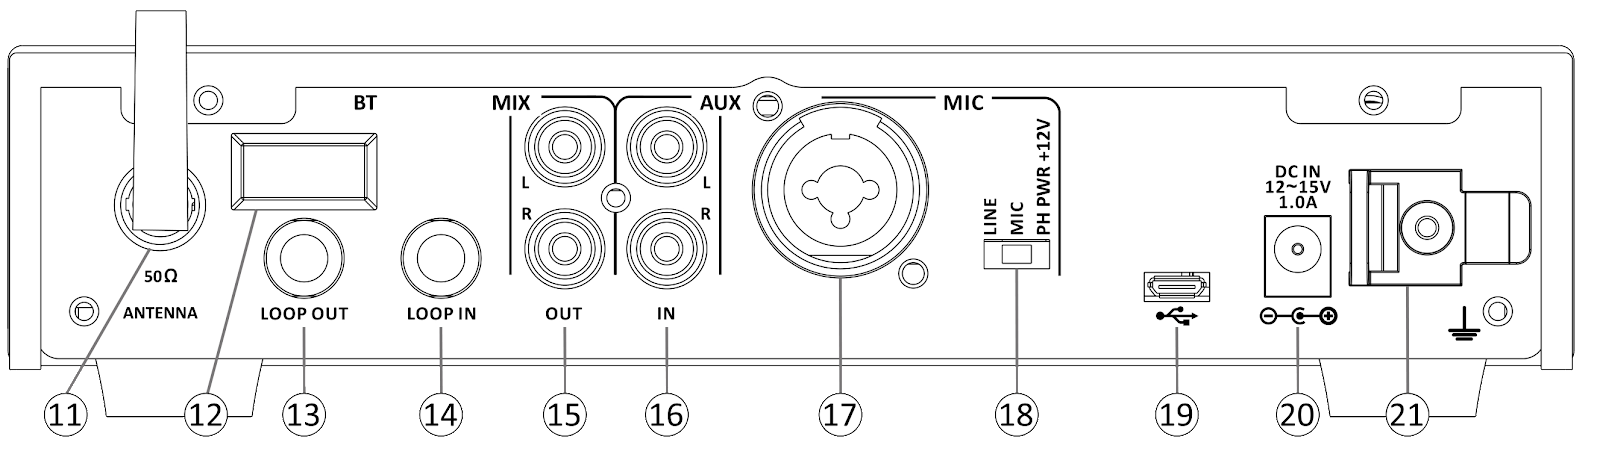
1. Power Button
2. 3.5 mm TRRS Jack Earphone/Headset Socket
3. Backlit Bluetooth Button
4. Earphone Volume Control
5. Backlit Microphone Button (mode: Transmitter) / FEED (mode: Interpreter O [1]/I)
6. Microphone Volume Control
7. Display
8. Menu/Set Knob
9. Backlit AUX Button (mode: Transmitter) / FEED THRU (mode: Interpreter O [1]/I)
10. AUX Volume Control
11. Antenna (TNC)
12. Bluetooth Sensor
13. 6.3 mm Jack Loop Output
14. 6.3 mm Jack Loop Input
15. RCA Mixed Audio Output
16. RCA Audio Input
17. COMBO Microphone/Line Socket
18. Line/Microphone/Phantom Switch
19. USB-A Port for Programming
20. Power Socket
21. Cable Holder
2. Display
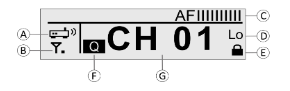
A. Mode
B. RF Signal Power
C. Audio Level
D. (RCA) Audio Input Level [2]
E. Channel Lock
F. Audio Quality
G. Channel Number
[2] Audio source level connected to RCA audio input.
3. Compatible CON-9R Receiver
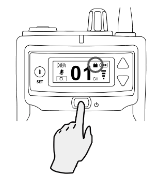
STEP 1. Press the power button for 1 sec. to turn on receivers.
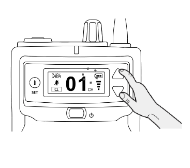
STEP 2. Press and hold the △ and ▽ buttons simultaneously until the symbol disappears from the display.
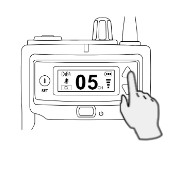
STEP 3. Select the same channel that the stationary transmitter is set to using the △ ▽ buttons.
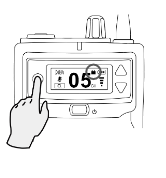
STEP 4. Confirm the channel number by pressing the SET button.
4. Connections
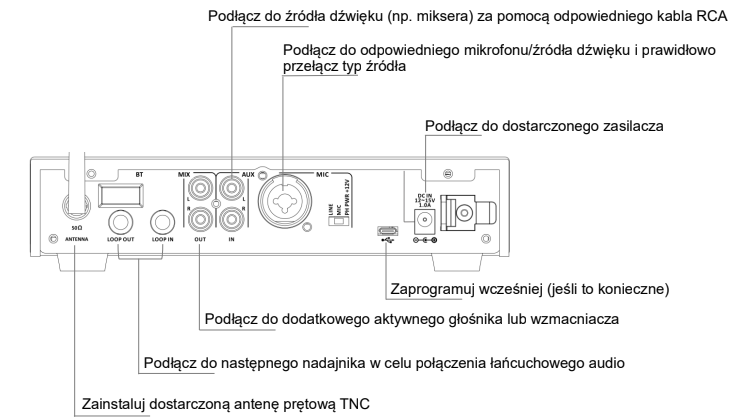
5. Audio Chain
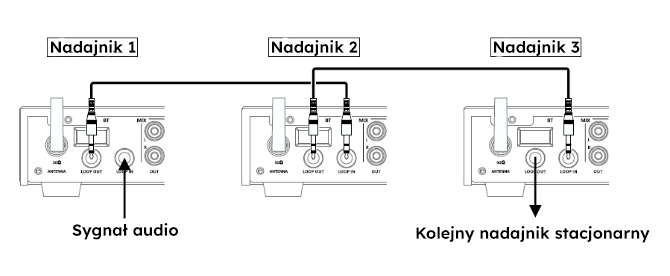
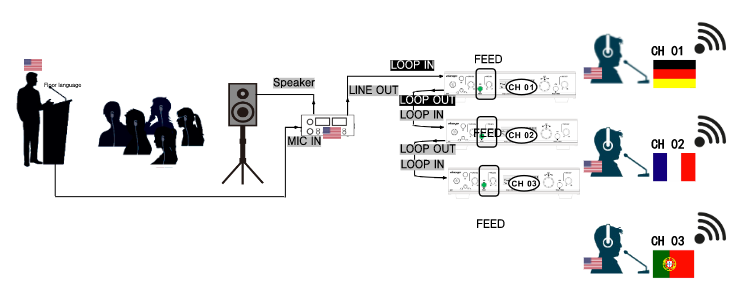
Connecting Loop IN/OUT enables daisy-chaining of the audio signal connected to LOOP IN of the first transmitter.
6. Settings
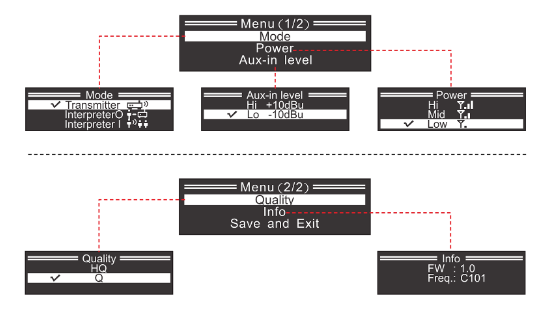
Press and hold the Menu/SET knob (8.) while turning on. The settings menu will appear and turn the knob (8.) left or right to select a setting, then enter by pressing the knob (8.). Remember to select "Save and Exit" to save all changed settings before exiting.
7. Programming Before Startup
If necessary, compile channels and settings using the included Okayo software (OK-CON-SW) (see additional software instructions).
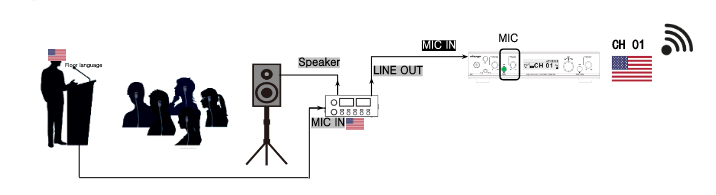
8. Applications
Seminar (Mode: Transmitter  )
)
Translation (Mode: Interpreter I  )
)
Translation with Relay Interpreter (Mode: Interpreter I )
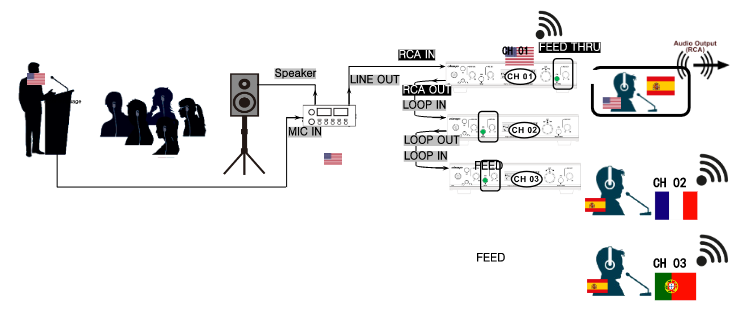
9. General Operation
9.1. Power On/Off
Press and hold the power button for 1 second to turn on/off
9.2. Channel Selection
Press and hold the knob (8.) for 1 second to unlock the channel (🔒︎ icon will disappear). Turn the knob (8.) right or left to select a channel and confirm by pressing the knob.
9.3. Check Channel Frequency
Simply press the knob (8.) briefly to check the frequency.
9.4. Monitor Audio Through Earphones
Connect earphones to the 3.5 mm earphone socket and adjust the volume to an appropriate level to monitor audio from the RCA audio input.
⚠ Warning
Listening at high volume for extended periods may cause hearing damage.
9.5. Transmit Selected Audio Files Wirelessly
Select the transmission type (3., 5., 9.) to transmit audio according to preferences.
10. Troubleshooting
Why can't I turn on the transmitter?
- Check whether power is properly connected to the transmitter.
- Check whether the power adapter is damaged (contact supplier).
Why is there no audio in the receivers?
- Check whether the receiver is turned on.
- Check whether the channel in the transmitter and receiver is the same.
- Check if the volume on the receiver is set correctly.
- Check if the earphone on the receiver is connected correctly.
- Check if the receiver is within range of a compatible transmitter.
Why can't the transmitter transmit audio wirelessly?
- Check if the audio is connected properly.
- Check if buttons 3, 5, 9 are set correctly.
- Check if all connection methods are correct (see "Applications").
Why is the transmitter's volume level quite low?
- Check if the audio level (low or high) is set correctly in the settings menu (see "Settings").