



Okayo OmniGuide 5in1
Instructions
Operating instructions for accessories
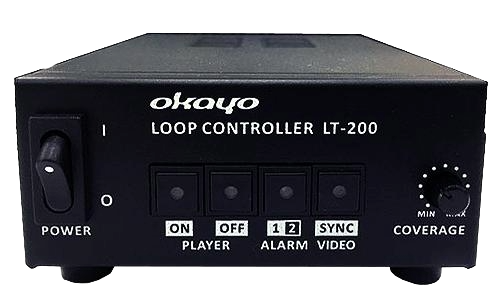
Okayo LT-200+
Okayo OMG-25U+VS
General Instructions
1. Before starting the tour guide system
- Ensure that a microphone or headset is connected to the transmitter and an earphone to the receiver. Check that the microphone/headset/earphone plug is properly inserted into the jack.
- Ensure that disposable batteries are correctly inserted or Ni-MH rechargeable batteries are charged (+ to +, - to -) in each device. For systems with a built-in battery, check its charge level.
2. Correct startup of the tour guide system
- Start by turning on the transmitter (or transmitters, if the system allows more than 1 transmitter to operate on the same channel) and selecting the desired transmission channel.
- If the transmitter has a microphone sensitivity adjustment setting, check that it is not too low. This also applies to the "mute" function.
- Then, turn on all receivers. The transmission channel should be set manually or via channel synchronization (if available in the model) to the same channel as the transmitter.
- Check that the volume on the receivers is not too low.
⚠ Note
Most popular tour guide systems allow only 1 transmitter to operate on 1 channel. Starting 2 transmitters on the same channel will cause interference or no transmission.
3. Tour guide system power management
3.1. Disposable batteries
- One battery bar on the display or a red LED on the device indicates a low battery level. At this point, replace the batteries with new ones, as the device will operate for a maximum of 1 hour.
- If the batteries discharged too quickly, insert new ones and check their operating time, or you can try inserting batteries from a different manufacturer.
- Low or high temperatures can affect battery life.
3.2. Rechargeable and built-in batteries
- One battery bar on the display or a red LED on the device indicates a low battery level. At this point, place the device in the charger (if the device has a micro USB input – it can be charged with a USB cable).
- Devices with rechargeable batteries are best charged 1 day or a few hours before planned use.
- The charging time for rechargeable batteries in a dedicated charger depends on the model and the battery's discharge level. For a completely discharged battery, charging time ranges from approximately 5 hours to 12 hours for the highest capacity batteries. Leaving devices in the charger overnight does not cause overcharging or any damage to the equipment.
- Remember to periodically replace worn-out rechargeable batteries with new ones. Depending on the manufacturer and capacity of the batteries, cycles (cyclic discharge and charge) can range from 500 to 1500.
⚠ Note
It is not recommended to connect more than one charger to an extension cord.
4. Transmission interference / no transmission - possible solutions
- Check if the transmitter/receiver is turned on.
- Check if the transmitter and receiver are on the same channel.
- Check if the transmitter/receiver is not muted.
- Check if 2 transmitters are not operating on the same channel.
- Check transmission quality on another channel.
- Check if the microphone/headphones are not damaged – test the receiver with an earphone and the transmitter with a microphone that you are sure are working correctly.
- Check if the battery is not discharged – test the device with a battery/rechargeable battery that works in another device (you are sure it is not discharged).
- Restart the tour guide system (turn off and on again).
Okayo OmniGuide 5in1 User Manual
1. Button and housing element explanations
1.1. OMG-100T Transmitter
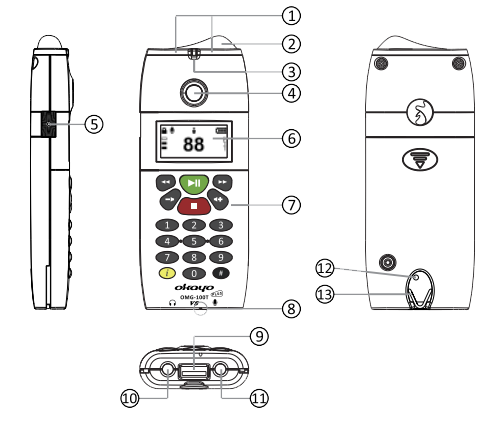
- Infrared sensor
- Antenna
- Charging / Talk / RF LED indicator
- Hearing Aid Compatible (HAC *) Speaker
- TALK button
- Backlit LCD screen
- Soft-touch keypad
- Built-in microphone
- Charging / Transfer connector
- 3.5 mm headphone jack
- 3.5 mm microphone jack
- Reset button
- Lanyard hole
* Hearing aid users can listen directly to the speaker.
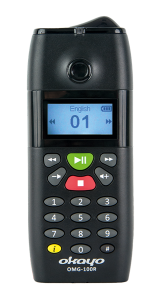
1.2. OMG-100R Receiver
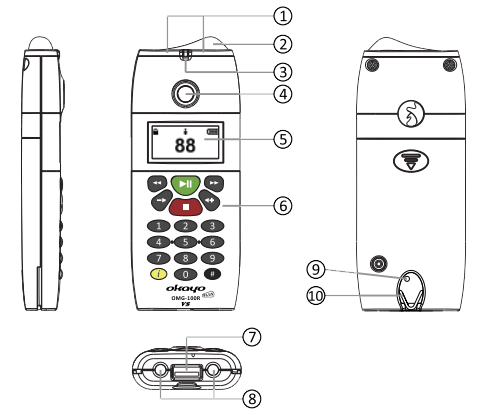
- Infrared sensor
- Antenna
- Charging / RF LED indicator
- Hearing Aid Compatible (HAC *) Speaker
- Backlit LCD screen
- Soft-touch keypad
- Charging / Transfer connector
- 3.5 mm headphone jacks
- Reset button
- Lanyard hole
* Hearing aid users can listen directly to the speaker.
1.3. Operating Modes Table
| Mode 1 | Mode 2 | Mode 3 | Mode 4 | Mode 5 | Mode 6 | |
|---|---|---|---|---|---|---|
|
OMG-100T |
Player |
Guide |
Leader |
Live* |
Lecture (M) |
Lecture (S) |
|
OMG-100R |
Player |
Guest |
Listen* |
- |
- |
- |
*The "player" mode is set as default.
2. Guided tour (Live mode)
The guide speaks live to guests.
| Mode | |
|---|---|
|
OMG-100T (guide) |
Live |
|
OMG-100R (guest) |
Listen |
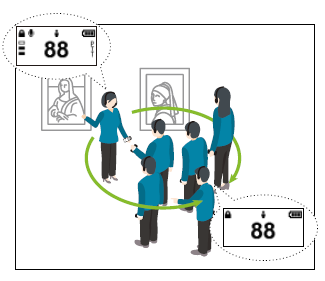
2.1. Powering on
- Press the ⏹ button to turn on the player.
- If
 appears, press both ⏹ and ⏯ buttons simultaneously to turn on the player.
⚠ Note
The devices have a built-in battery. Make sure it is fully charged before use.
2.2. Assigning a channel for operation
- Turn on the transmitter and receiver.
- Enter # and press the ⏯ button - do this on both the transmitter and receiver.
- On the transmitter, you will see the last selected channel number flashing slowly. On the receiver, it will flash quickly.
- Using the ⏪︎ or ⏩︎ buttons, you can select a new channel on the transmitter.
- Confirm the selection of the new channel by pressing the ⏯ button - the channel number will start flashing faster.
- At this point, the transmitter remotely assigns the selected channel to the receiver.
- When the receiver accepts the new channel, the number on the display will stop flashing. The channel has been set.
- If the channel cannot be assigned to the receiver, the previously selected number will flash until the ⏹ button is pressed.
- To exit channel setting, press the ⏹ button.
⚠ Note
There is no power-on sequence between OMG-100T and OMG-100R for channel assignment.
2.3. Changing the channel
- Once powered on, both the transmitter and receiver have the ability to change the channel locked. Press and hold the ⏪︎ and ⏩︎ buttons simultaneously until the 🔒︎ symbol disappears from the display. The last selected channel number will start flashing on the display.
- Using the ⏪︎ or ⏩︎ buttons, select a new channel.
- Confirm the selection with the button or do nothing – after 5 seconds, the selection will be confirmed automatically.
2.4. Transmission from the OMG-100T transmitter
- By holding down the ➄ button, the guide can broadcast to group members equipped with receivers (the transmitter and receivers must be set to the same channel).
- The guide can change the operation of the ➄ button by choosing from:
a) PTB (push to bolt) - press to speak, press again to mute
b) PTM (push to mute) – hold to mute
c) PTT (default - push to talk) – hold when you want to transmit
2.5. Changing transmission and microphone settings
- Start the transmitter in settings mode: press and hold the 3 buttons: #, ⏹ and ⏯.
- The display will show the default Live operating mode. You can change it using the ⏪︎ or ⏩︎ buttons or immediately proceed to change the operation mode of button ⑤ by pressing ⏯.
- The display will show the default selected PTT mode. You can change it using the ⏪︎ or ⏩︎ buttons or immediately proceed to change the microphone sensitivity by pressing ⏯.
- The display will show the default selected medium microphone sensitivity level Mid. You can change it using the ⏪︎ or ⏩︎ buttons.
- Finally, press the ⏯ button to confirm your selection. The transmitter will then turn off automatically.
* If the OMG-100T was previously turned off by simultaneously pressing the ⏹ and ⏯ buttons, at this stage, you must simultaneously press the #, ⏹ and ⏯ buttons.
2.6. Adjusting the volume level
- Press the 🔈︎− or 🔈︎+ button to adjust the receiver volume (the receiver must be turned on).
- After setting the preferred volume, leave it for 1 second, and the OMG-100R will automatically exit this setting.
⚠ Note
There are a total of 11 volume levels, and the default volume is level 6. When set to level 0, the device will be muted.
Please note that prolonged listening at high volume can cause hearing damage.
2.7. Powering off
- To turn off the device, press and hold the ⏹ button for 10 seconds until the "OFF" message appears, or place the device in the charger. The anti-theft system will remain active.
- To turn off the device along with the anti-theft system, press and hold the ⏹ and ⏯ buttons for 3 seconds.
2.8. Information page
- Press the yellow ⓘ button when the device is turned on.
- The above screen will appear.
- Create your own information page using the PC application – AUDIO MASTER 3.
2.9. Check settings
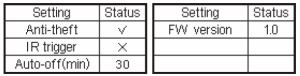
- To check the settings, simultaneously press the ⓘ and ⏹ buttons when the device is off*
- The above screen will appear. Use the ⏪︎ or ⏩︎ buttons to scroll through the page.
- To exit, press ⏹
* If the device was previously turned off using the ⏹ and ⏯ button combination, to check the settings, you must simultaneously press ⓘ, ⏹ and ⏯.
3. Individual tour with audio guide (Audio-tour mode)
Audio playback only.
| Mode | |
|---|---|
|
OMG-100T (visitor) |
Player |
|
OMG-100R (visitor) |
Player |
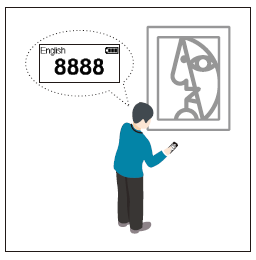
3.1. Powering on
- Briefly press the ⏹ button to turn on the player.
- If 🔒︎ appears, briefly press both ⏹ and ⏯ buttons simultaneously to turn on the player.
⚠ Note
The devices have a built-in battery - make sure it is fully charged before use.
3.2. Changing to Player mode (OMG-100T)
- Press the # and ⏹ buttons simultaneously to turn on the transmitter.*
- The display will show the default Live setting. Use the ⏪︎ or ⏩︎ buttons to change the mode to Player.
- Confirm your selection with the ⏯ button. The device will automatically turn off.
* If the device was previously turned off using the ⏹ and ⏯ button combination, to restart it, you must simultaneously press #, ⏹ and ⏯.
3.3. Changing to Player mode (OMG-100R)
- Press the # and ⏹ buttons simultaneously to turn on the receiver.*
- The display will show the default Live setting. Use the ⏪︎ or ⏩︎ buttons to change the mode to Player.
- Confirm your selection with the ⏯ button. The device will automatically turn off.
* If the device was previously turned off using the ⏹ and ⏯ button combination, to restart it, you must simultaneously press #, ⏹ and ⏯.
3.4. Language selection (recording language folders are numbered from 1 to 32)
- After turning on the device, you will see the language change screen with the default selection of folder 01 and the language name.
- Select your language using the ⏪︎ or ⏩︎ buttons.
- Confirm with the ⏯ button.
3.5. Changing playback language during use (if necessary)
- If you intend to change the language while the player is on, enter #1, then press the ⏯ button.
- Press the ⏪︎ or ⏩︎ button to select the language.
- Press the ⏯ button again to confirm the selected language and exit the setting.
3.6. Selecting and listening to a broadcast
- When the device is already in Player mode, select the broadcast number using the 0-9 keys. If you want to change an incorrectly entered number - press ⏹.
- Press ⏯ to play.
- To fast forward or rewind the recording, hold down the ⏪︎ or ⏩︎ button.
- To stop playback, press ⏯. To resume – press again.
- To turn off the broadcast before it ends, press ⏹.
⚠ Note
The broadcast will start automatically after selecting the number without pressing the ⏯ button if the "auto-play" option was selected in Audio Master 3 software.
3.7. Adjusting the volume level
- Press the 🔈︎− or 🔈︎+ button to adjust the playback volume when the device is turned on.
- After setting the preferred volume, leave it for 1 second, and the player will automatically exit this setting.
⚠ Note
There are a total of 11 volume levels, and the default volume is level 6. When set to level 0, the device will be muted.
Please note that prolonged listening at high volume can cause hearing damage.
3.8. Powering off
- To turn off the device, press and hold the ⏹ button for 10 seconds until the "OFF" message appears, or place the device in the charger. The anti-theft system will remain active.
- To turn off the device along with the anti-theft system, press and hold the ⏹ and ⏯ buttons for 3 seconds.
3.9. Information page
- Press the yellow ⓘ button when the device is turned on.
- The above screen will appear.
- Create your own information page using the PC application – AUDIO MASTER 3.
3.10. Check settings
- To check the settings, simultaneously press the ⓘ and ⏹ buttons when the device is off.*
- The above screen will appear. Use the ⏪︎ or ⏩︎ buttons to scroll through the page.
- To exit, press ⏹.
* If the device was previously turned off using the ⏹ and ⏯ button combination, to check the settings, you must simultaneously press ⓘ, ⏹ and ⏯.
4. Audio guide tour mode
The guide has the option not only to provide live commentary but also to transmit broadcasts.
| Mode | |
|---|---|
|
OMG-100T (guide) |
Guide |
|
OMG-100R (group member) |
Listen |
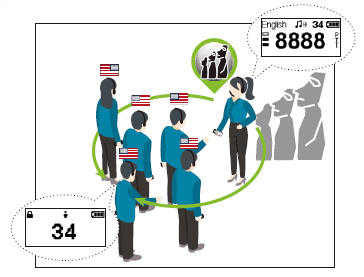
4.1. Powering on
- Briefly press the ⏹ button to turn on the player.
- If 🔒︎ appears, briefly press both ⏹ and ⏯ buttons simultaneously to turn on the player.
⚠ Note
The devices have a built-in battery. Make sure it is fully charged before use.
4.2. Changing to Guide mode (OMG-100T)
- Press the # and ⏹ buttons simultaneously to turn on the receiver.*
- The display will show the default Live setting. Use the ⏪︎ or ⏩︎ buttons to change the mode to Guide.
- Confirm your selection with the ⏯ button. The device will automatically turn off.
* If the device was previously turned off using the ⏹ and ⏯ button combination, to restart it, you must simultaneously press #, ⏹ and ⏯.
4.3. Changing to Listen mode (OMG-100R)
- Press the # and ⏹ buttons simultaneously to turn on the receiver.*
- The display will show the default Listen setting. Use the ⏪︎ or ⏩︎ buttons to change the mode to Listen.
- Confirm your selection with the ⏯ button. The device will automatically turn off.
* If the device was previously turned off using the ⏹ and ⏯ button combination, to restart it, you must simultaneously press #, ⏹ and ⏯.
4.4. Assigning a channel for operation
- Turn on the transmitter and receiver
- Enter # and press the ⏯ button - do this on both the transmitter and receiver.
- On the transmitter, you will see the last selected channel number flashing slowly. On the receiver, it will flash quickly.
- Using the ⏪︎ or ⏩︎ buttons, you can select a new channel on the transmitter
- Confirm the selection of the new channel by pressing the ⏯ button - the channel number will start flashing faster.
- At this point, the transmitter remotely assigns the selected channel to the receiver.
- When the receiver accepts the new channel, the number on the display will stop flashing. The channel has been set.
- If the channel cannot be assigned to the receiver, the previously selected number will flash until the ⏹ button is pressed.
- To exit channel setting, press the ⏹ button.
⚠ Note
There is no power-on sequence between OMG-100T and OMG-100R for channel assignment.
4.5. Changing the channel (if necessary)
- Once powered on, both the transmitter and receiver have the ability to change the channel locked.
- Press and hold the ⏪︎ and ⏩︎ buttons simultaneously until the 🔒︎ symbol disappears from the display. The last selected channel number will start flashing on the display.
- Using the ⏪︎ or ⏩︎ buttons, select a new channel.
- Confirm the selection with the button or do nothing – after 5 seconds, the selection will be confirmed automatically.
4.6. Transmission from the OMG-100T transmitter
- By holding down the ➄ button, the guide can broadcast to group members equipped with receivers (the transmitter and receivers must be set to the same channel).
- The guide can change the operation of the ➄ button by choosing from:
a) PTB (push to bolt) - press to speak, press again to mute
b) PTM (push to mute) – hold to mute
c) PTT (default - push to talk) – hold when you want to transmit
4.7. Changing transmission and microphone settings (OMG-100T)
- Start the transmitter in settings mode: press and hold the 3 buttons: #, ⏹ and ⏯.
- The display will show the default Guide operating mode. You can change it using the ⏪︎ or ⏩︎ buttons or immediately proceed to change the operation mode of button ⑤ by pressing ⏯.
- The display will show the default selected PTT mode. You can change it using the ⏪︎ or ⏩︎ buttons or immediately proceed to change the microphone sensitivity by pressing ⏯.
- The display will show the default selected medium microphone sensitivity level Mid. You can change it using the ⏪︎ or ⏩︎ buttons.
- Finally, press the ⏯ button to confirm your selection. The transmitter will then turn off automatically.
* If the OMG-100T was previously turned off by simultaneously pressing the ⏹ and ⏯ buttons, at this stage, you must simultaneously press the #, ⏹ and ⏯ buttons.
4.8. Transmission of a recording (broadcast) from the transmitter to the receivers
- On the transmitter, enter the broadcast number using the 0-9 buttons.
- Press the ⏯ button to play and transmit the selected broadcast.
- The receivers will start playing the transmitted broadcast.
- If the guide presses the Talk ⑤ button on the transmitter to provide live commentary, the broadcast will be automatically paused.
⚠ Note
The track playing on the OMG-100R cannot be stopped by pressing the ⏹ button on the OMG-100R.
4.9. Language selection (recording language folders are numbered from 1 to 32)
- After turning on the device, you will see the language change screen with the default selection of folder 01 and the language name.
- Select your language using the ⏪︎ or ⏩︎ buttons.
- Confirm with the ⏯ button.
4.10. Changing playback language during use (if necessary) (OMG-100T)
- If you intend to change the language while the player is on, enter #1, then press the ⏯ button.
- Press the ⏪︎ or ⏩︎ button to select the language.
- Press the ⏯ button again to confirm the selected language and exit the setting.
4.11. Adjusting the volume level
- Press the 🔈︎− or 🔈︎+ button to adjust the playback volume when the device is turned on.
- After setting the preferred volume, leave it for 1 second, and the player will automatically exit this setting.
⚠ Note
There are a total of 11 volume levels, and the default volume is level 6. When set to level 0, the device will be muted.
Please note that prolonged listening at high volume can cause hearing damage.
4.12. Powering off
- To turn off the device, press and hold the ⏹ button for 10 seconds until the "OFF" message appears, or place the device in the charger. The anti-theft system will remain active.
- To turn off the device along with the anti-theft system, press and hold the ⏹ and ⏯ buttons for 3 seconds.
4.13. Information page
- Press the yellow ⓘ button when the device is turned on.
- The above screen will appear.
- Create your own information page using the PC application – AUDIO MASTER 3.
4.14. Check settings
- To check the settings, simultaneously press the ⓘ and ⏹ buttons when the device is off.*
- The above screen will appear. Use the ⏪︎ or ⏩︎ buttons to scroll through the page.
- To exit, press ⏹.
* If the device was previously turned off using the ⏹ and ⏯ button combination, to check the settings, you must simultaneously press ⓘ, ⏹ and ⏯.
5. Multilingual tours (multi-tour)
In addition to live commentary, the guide can remotely trigger broadcasts on visitors' receivers. The broadcast will start in the language version selected for a given receiver. This mode allows guiding linguistically diverse groups.
| Mode | |
|---|---|
|
OMG-100T (guide) |
Leader |
|
OMG-100R (group member) |
Guest |
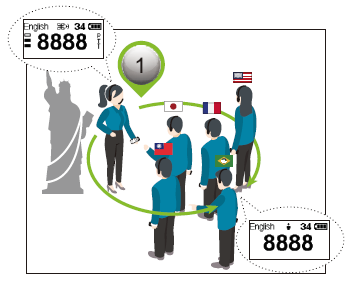
5.1. Powering on
- Briefly press the ⏹ button to turn on the player.
- If appears, briefly press both ⏹ and ⏯ buttons simultaneously to turn on the player.
⚠ Note
The devices have a built-in battery. Make sure it is fully charged before use.
5.2. Changing to Leader mode (OMG-100T)
- Press the # and ⏹ buttons simultaneously to turn on the receiver.*
- The display will show the default Live setting. Use the ⏪︎ or ⏩︎ buttons to change the mode to Leader.
- Confirm your selection with the ⏯ button. The device will automatically turn off.
*If the device was previously turned off using the ⏹ and ⏯ button combination, to restart it, you must simultaneously press #, ⏹ and ⏯.
5.3. Changing to Guest mode (OMG-100R)
- Press the # and ⏹ buttons simultaneously to turn on the receiver.*
- The display will show the default Listen setting. Use the ⏪︎ or ⏩︎ buttons to change the mode to Guest.
- Confirm your selection with the ⏯ button. The device will automatically turn off.
* If the device was previously turned off using the ⏹ and ⏯ button combination, to restart it, you must simultaneously press #, ⏹ and ⏯.
5.4. Assigning a channel for operation
- Turn on the transmitter and receiver
- Enter # and press the ⏯ button - do this on both the transmitter and receiver.
- On the transmitter, you will see the last selected channel number flashing slowly. On the receiver, it will flash quickly.
- Using the ⏪︎ or ⏩︎ buttons, you can select a new channel on the transmitter
- Confirm the selection of the new channel by pressing the ⏯ button - the channel number will start flashing faster.
- At this point, the transmitter remotely assigns the selected channel to the receiver.
- When the receiver accepts the new channel, the number on the display will stop flashing. The channel has been set.
- If the channel cannot be assigned to the receiver, the previously selected number will flash until the ⏹ button is pressed.
- To exit channel setting, press the ⏹ button.
⚠ Note
There is no power-on sequence between OMG-100T and OMG-100R for channel assignment.
5.5. Changing the channel (if necessary)
- Once powered on, both the transmitter and receiver have the ability to change the channel locked.
- Press and hold the ⏪︎ and ⏩︎ buttons simultaneously until the 🔒︎ symbol disappears from the display. The last selected channel number will start flashing on the display.
- Using the ⏪︎ or ⏩︎ buttons, select a new channel.
- Confirm the selection with the button or do nothing – after 5 seconds, the selection will be confirmed automatically.
5.6. Transmission from the OMG-100T transmitter
- By holding down the ➄ button, the guide can broadcast to group members equipped with receivers (the transmitter and receivers must be set to the same channel).
- The guide can change the operation of the ➄ button by choosing from:
a) PTB (push to bolt) - press to speak, press again to mute.
b) PTM (push to mute) – hold to mute.
c) PTT (default - push to talk) – hold when you want to transmit.
5.7. Changing transmission and microphone settings (OMG-100T)
- Start the transmitter in settings mode: press and hold the 3 buttons: #, ⏹ and ⏯
- The display will show the default Leader operating mode. You can change it using the ⏪︎ or ⏩︎ buttons or immediately proceed to change the operation mode of button ⑤ by pressing ⏯.
- The display will show the default selected PTT mode. You can change it using the ⏪︎ or ⏩︎ buttons or immediately proceed to change the microphone sensitivity by pressing ⏯.
- The display will show the default selected medium microphone sensitivity level Mid. You can change it using the ⏪︎ or ⏩︎ buttons.
- Finally, press the ⏯ button to confirm your selection. The transmitter will then turn off automatically.
* If the OMG-100T was previously turned off by simultaneously pressing the ⏹ and ⏯ buttons, at this stage, you must simultaneously press the #, ⏹ and ⏯ buttons.
5.8. Assign your track command to group members (OMG-100T)
- Enter the preferred track number on the OMG-100T.
- Press the button on the OMG-100T to assign the track command to the OMG-100R.
- The OMG-100R starts playing the track assigned by the OMG-100T.
- This track will be paused if the Talk function is enabled on the OMG-100T.
⚠ Note
The track playing on the OMG-100R cannot be stopped by pressing the ⏹ button on the OMG-100T.
5.9. Language selection (recording language folders are numbered from 1 to 32)
- After turning on the device, you will see the language change screen with the default selection of folder 01 and the language name.
- Select your language using the ⏪︎ or ⏩︎ buttons.
- Confirm with the ⏯ button.
5.10. Changing playback language during use (if necessary) (OMG-100T)
- If you intend to change the language while the player is on, enter #1, then press the ⏯ button.
- Press the ⏪︎ or ⏩︎ button to select the language.
- Press the ⏯ button again to confirm the selected language and exit the setting.
5.11. Adjusting the volume level
- Press the 🔈︎− or 🔈︎+ button to adjust the playback volume when the device is turned on.
- After setting the preferred volume, leave it for 1 second, and the player will automatically exit this setting.
⚠ Note
There are a total of 11 volume levels, and the default volume is level 6. When set to level 0, the device will be muted.
Please note that prolonged listening at high volume can cause hearing damage.
5.12. Powering off
- To turn off the device, press and hold the ⏹ button for 10 seconds until the "OFF" message appears, or place the device in the charger. The anti-theft system will remain active.
- To turn off the device along with the anti-theft system, press and hold the ⏹ and ⏯ buttons for 3 seconds.
5.13. Information page
- Press the yellow ⓘ button when the device is turned on.
- The above screen will appear.
- Create your own information page using the PC application - AUDIO MASTER 3.
5.14. Check settings
- To check the settings, simultaneously press the ⓘ and ⏹ buttons when the device is off.*
- The above screen will appear. Use the ⏪︎ or ⏩︎ buttons to scroll through the page.
- To exit, press ⏹.
* If the device was previously turned off using the ⏹ and ⏯ button combination, to check the settings, you must simultaneously press ⓘ, ⏹ and ⏯.
6. 2 speakers / 2 guides mode
In this mode, 2 people can use 2 transmitters on the same channel simultaneously.
| Mode | |
|---|---|
|
OMG-100T (speaker) |
Lecture (M) |
|
OMG-100T (speaker assistant) |
Lecture (S) |
|
OMG-100R (participant) |
Listen |
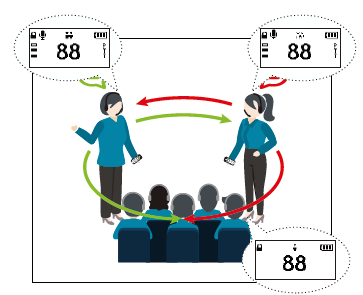
6.1. Powering on
- Briefly press the ⏹ button to turn on the player.
- If appears, briefly press both ⏹ and ⏯ buttons simultaneously to turn on the player.
⚠ Note
The devices have a built-in battery. Make sure it is fully charged before use.
6.2. Changing to Lecture (M) or Lecture (S) mode (OMG-100T)
- Press the # and ⏹ buttons simultaneously to turn on the receiver.*
- The display will show the default Live setting. Use the ⏪︎ or ⏩︎ buttons to change the mode to Lecture(M) or Lecture(S).
- Confirm your selection with the ⏯ button. The device will automatically turn off.
* If the device was previously turned off using the ⏹ and ⏯ button combination, to restart it, you must simultaneously press #, ⏹ and ⏯.
6.3. Changing to Listen mode (OMG-100R)
- Press the # and ⏹ buttons simultaneously to turn on the receiver.*
- The display will show the default Listen setting. Use the ⏪︎ or ⏩︎ buttons to change the mode to Listen.
- Confirm your selection with the ⏯ button. The device will automatically turn off.
* If the device was previously turned off using the ⏹ and ⏯ button combination, to restart it, you must simultaneously press #, ⏹ and ⏯.
6.4. Assigning a channel for operation
- Turn on the transmitter and receiver
- Enter # and press the ⏯ button - do this on both the transmitter and receiver.
- On the transmitter, you will see the last selected channel number flashing slowly. On the receiver, it will flash quickly.
- Using the ⏪︎ or ⏩︎ buttons, you can select a new channel on the transmitter
- Confirm the selection of the new channel by pressing the ⏯ button - the channel number will start flashing faster.
- At this point, the transmitter remotely assigns the selected channel to the receiver.
- When the receiver accepts the new channel, the number on the display will stop flashing. The channel has been set.
- If the channel cannot be assigned to the receiver, the previously selected number will flash until the ⏹ button is pressed.
- To exit channel setting, press the ⏹ button.
⚠ Note
There is no power-on sequence between OMG-100T and OMG-100R for channel assignment.
6.5. Changing the channel (if necessary)
- Once powered on, both the transmitter and receiver have the ability to change the channel locked.
- Press and hold the ⏪︎ and ⏩︎ buttons simultaneously until the 🔒︎ symbol disappears from the display. The last selected channel number will start flashing on the display.
- Using the ⏪︎ or ⏩︎ buttons, select a new channel.
- Confirm the selection with the button or do nothing – after 5 seconds, the selection will be confirmed automatically.
6.6. Conversation with participants from the OMG-100T transmitter
- Both guides/speakers can talk to participants using the Talk ➄ button.
- The guide can change the operation of the ➄ button by choosing from:
a) PTB (push to bolt) - press to speak, press again to mute.
b) PTM (push to mute) – hold to mute.
c) PTT (default - push to talk) – hold when you want to transmit.
6.7. Changing transmission and microphone settings (OMG-100T)
- Start the transmitter in settings mode: press and hold the 3 buttons: #, ⏹ and ⏯.
- The display will show the default Lecture(M) or Lecture(S) operating mode. You can change it using the ⏪︎ or ⏩︎ buttons or immediately proceed to change the operation mode of button ⑤ by pressing ⏯.
- The display will show the default selected PTT mode. You can change it using the ⏪︎ or ⏩︎ buttons or immediately proceed to change the microphone sensitivity by pressing ⏯.
- The display will show the default selected medium microphone sensitivity level Mid. You can change it using the ⏪︎ or ⏩︎ buttons.
- Finally, press the ⏯ button to confirm your selection. The transmitter will then turn off automatically.
* If the OMG-100T was previously turned off by simultaneously pressing the ⏹ and ⏯ buttons, at this stage, you must simultaneously press the #, ⏹ and ⏯ buttons.
6.8. Transmission of a recording (broadcast) from the transmitter to the receivers
- On the transmitter, enter the broadcast number using the 0-9 buttons.
- Press the ⏯ button to play and transmit the selected audio.
- Receivers will start playing the transmitted audio.
- If the guide presses the Talk ⑤ button on the transmitter to provide live commentary, the audio will be automatically paused.
⚠ Note
The OMG-100R cannot stop the track content sent by the OMG-100T if the button on the OMG-100R is pressed.
6.9. Language Selection (recording language folders are numbered from 1 to 32) (OMG-100T)
- After turning on the device, you will see the language change screen with the default selection of folder 01 and the language name.
- Select your language using the ⏪︎ or ⏩︎ buttons.
- Confirm with the ⏯ button.
6.10. Changing the playback language during use (if necessary) (OMG-100T)
- If you intend to change the language while the player is on, enter #1, then press the ⏯ button.
- Press the ⏪︎ or ⏩︎ button to select the language.
- Press the ⏯ button again to confirm the selected language and exit the setting.
6.11. Adjusting the volume level
- Press the 🔈︎− or 🔈︎+ button to adjust the playback volume when the device is on.
- After setting your preferred volume, leave it for 1 second, and the player will automatically exit this setting.
⚠ Note
There are 11 volume levels in total, and the default volume is level 6. When set to level 0, the device will be muted.
Please note that prolonged listening at high volume may cause hearing damage.
6.12. Powering Off
- To turn off the device, press and hold the ⏹ button for 10 seconds until the "OFF" message appears, or place the device in the charger. The anti-theft system will remain active.
- To turn off the device along with the anti-theft system, press and hold the ⏹ and ⏯ buttons for 3 seconds.
6.13. Information Page
- Press the yellow ⓘ button when the device is on.
- The above screen will appear.
- Create your own information page using the PC application - AUDIO MASTER 3.
6.14. Check settings
- To check the settings, press the ⓘ and ⏹ buttons simultaneously when the device is off.*
- The above screen will appear. Use the ⏪︎ or ⏩︎ buttons to scroll the page.
- To exit, press ⏹.
* If the device was previously turned off using the ⏹ and ⏯ button combination, to check the settings, you must press ⓘ, ⏹, and ⏯ simultaneously.
7. 2-Speaker Mode (Group Discussion)
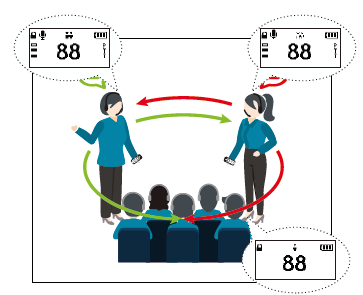
All group members have OMG-100T. Max. 2 members can talk simultaneously.
| Mode | |
|---|---|
|
OMG-100T (transmitter 1) |
Lecture (M) |
|
OMG-100T (transmitter 2) |
Lecture (S) |
Lecture(S) will only be available if Lecture(M) mode is selected in the first transmitter beforehand.
7.1. Powering On
- Briefly press the ⏹ button to turn on the player.
- If appears, briefly press both the ⏹ and ⏯ buttons simultaneously to turn on the player.
7.2. Changing to Lecture (M) or Lecture (S) mode
- Press the # and ⏹ buttons simultaneously to turn on the receiver.*
- The display will show the default Live setting. Use the ⏪︎ or ⏩︎ buttons to change the mode to Lecture(M) or Lecture(S).
- Confirm your selection with the ⏯ button. The device will automatically turn off.
* If the device was previously turned off using the ⏹ and ⏯ button combination, to restart it, you must press #, ⏹, and ⏯ simultaneously.
7.3. Changing the channel (if necessary)
- After powering on, both the transmitter and receiver have channel change locked.
- Press and hold the ⏪︎ and ⏩︎ buttons simultaneously until the 🔒︎ symbol disappears from the display. The last selected channel number will start flashing on the display.
- Use the ⏪︎ or ⏩︎ buttons to select a new channel.
- Confirm your selection with the button or do nothing – after 5 seconds, the selection will be confirmed automatically.
7.4. Transmission from OMG-100T transmitter
- All group members can speak by pressing the Talk ➄ button.
- The guide can change the function of button ➄ by choosing from:
a) PTB (push to bolt) - press to speak, press again to mute
b) PTM (push to mute) – hold to mute
c) PTT (default - push to talk) – hold when you want to transmit
⚠ Note
Max. 2 people in the group (including the guide) can speak simultaneously. If a third person intends to speak, a symbol resembling  will appear on the screen.
Wait until the other person releases the talk button.
will appear on the screen.
Wait until the other person releases the talk button.
7.5. Changing transmission and microphone settings
- Start the transmitter in settings mode: press and hold 3 buttons: #, ⏹, and ⏯.
- The screen will show the default operating mode Lecture(M) or Lecture(S). You can change it with the ⏪︎ or ⏩︎ buttons or proceed directly to change the function of button ⑤ by pressing ⏯.
- The screen will show the default selected mode PTT. You can change it with the ⏪︎ or ⏩︎ buttons or proceed directly to change the microphone sensitivity by pressing ⏯.
- The screen will show the default selected medium microphone sensitivity level Mid. You can change it with the ⏪︎ or ⏩︎ buttons.
- Finally, press the ⏯ button to confirm your selection. The transmitter will then automatically turn off.
* If the OMG-100T was previously turned off by simultaneously pressing the ⏹ and ⏯ buttons, at this stage, you must simultaneously press the #, ⏹, and ⏯ buttons.
7.6. Language Selection (recording language folders are numbered from 1 to 32) (OMG-100T)
- After turning on the device, you will see the language change screen with the default selection of folder 01 and the language name.
- Select your language using the ⏪︎ or ⏩︎ buttons.
- Confirm with the ⏯ button.
7.7. Changing the playback language during use (if necessary) (OMG-100T)
- If you intend to change the language while the player is on, enter #1, then press the ⏯ button.
- Press the ⏪︎ or ⏩︎ button to select the language.
- Press the ⏯ button again to confirm the selected language and exit the setting.
7.8. Adjusting the volume level
- Press the 🔈︎− or 🔈︎+ button to adjust the playback volume when the device is on.
- After setting your preferred volume, leave it for 1 second, and the player will automatically exit this setting.
⚠ Note
There are 11 volume levels in total, and the default volume is level 6. When set to level 0, the device will be muted.
Please note that prolonged listening at high volume may cause hearing damage.
7.9. Powering Off
- To turn off the device, press and hold the ⏹ button for 10 seconds until the "OFF" message appears, or place the device in the charger. The anti-theft system will remain active.
- To turn off the device along with the anti-theft system, press and hold the ⏹ and ⏯ buttons for 3 seconds.
7.10. Information Page
- Press the yellow ⓘ button when the device is on.
- The above screen will appear.
- Create your own information page using the PC application - AUDIO MASTER 3.
7.11. Check settings
- To check the settings, press the ⓘ and ⏹ buttons simultaneously when the device is off.*
- The above screen will appear. Use the ⏪︎ or ⏩︎ buttons to scroll the page.
- To exit, press ⏹.
* If the device was previously turned off using the ⏹ and ⏯ button combination, to check the settings, you must press ⓘ, ⏹, and ⏯ simultaneously.
8. Troubleshooting
OMG-100T cannot hear its own voice.
- Ensure that the headphones and microphone are correctly connected to the player.
- Ensure that the TALK mode is correctly set.
- If the above solutions do not resolve the problem, return the player to the vendor.
OMG-100R cannot hear OMG-100T.
- Ensure that the selected channel on OMG-100T and OMG-100R is the same.
- Ensure that the OMG-100R is within the operating range of the OMG-100T.
- Interference may potentially occur. Stay away from other tours and stick to your own.
- If the above solutions do not resolve the problem, return the player to the vendor.

- There is no track in the folder.

- The track does not exist.

- An SD card error occurred in the player. Restart the player or press the reset button ➅ on the back.
- If this error persists, return the player to the vendor.
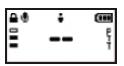
- Wireless communication will fail if "- -" appears. Return the player to your vendor.

- Low battery level. Connect the player to the charger for immediate charging.

- When this screen appears, the alarm will also be activated. Return the player to trigger the alarm.
- To temporarily mute the player (the alarm screen is still on), press both the ⏹ and ⏯ buttons simultaneously.
- The alarm can be triggered using the LT-200+ loop controller or chargers / uploaders.

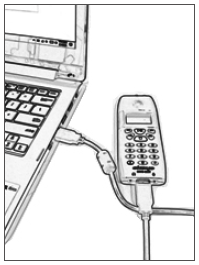
- To charge the player directly via charging cable, press the # button after connecting the player to the computer. When the battery symbol appears on the screen, the player is charging.
9. Technical Specification
OMG-100T
| Parameter | Value |
|---|---|
|
Display |
1.3 inch LCD (132 x 64 pixel) |
|
Frequency Response |
300 Hz ~ 3.5 kHz |
|
Operating Range |
> 50 M |
|
Speaker |
Built-in 0.5 W at 8 Ω |
|
Headphone Jack |
3.5 mm x 1 (stereo) |
|
Microphone Jack |
3.5 mm x 1 |
|
Interface |
USB 2.0 Type A |
|
Memory Capacity |
Micro SD 8 GB, supports up to 32 GB |
|
Automatic Triggering |
IR |
|
Alarm |
Anti-theft system |
|
Number of Languages |
Max. 32 |
|
Number of Messages |
Max. 9999 x 32 |
|
Operating Temperature |
-10 °C ~ +60 °C |
|
Battery |
3.7 V, 1300 mAh Lithium-Polymer Battery |
|
Battery Life |
10 hours |
|
Dimensions (D x W x H) |
19.2 x 50.7 x 127.3 (mm) |
|
Weight |
100 g (with battery) |
OMG-100R
| Parameter | Value |
|---|---|
|
Display |
1.3-inch LCD (132 x 64 pixels) |
|
Frequency Response |
300 Hz ~ 3.5 kHz |
|
Operating Range |
> 50 M |
|
Speaker |
Built-in 0.5 W at 8 Ω |
|
Headphone Jack |
3.5 mm x 2 (stereo) |
|
Interface |
USB 2.0 Type A |
|
Memory Capacity |
Micro SD 8 GB, supports up to 32 GB |
|
Automatic Triggering |
IR |
|
Alarm |
Anti-theft system |
|
Number of Languages |
Max. 32 |
|
Number of Messages |
Max. 9999 x 32 |
|
Operating Temperature |
-10 °C ~ +60 °C |
|
Battery |
3.7 V, 1300 mAh Lithium-Polymer Battery |
|
Battery Life |
12 hours |
|
Dimensions (D x W x H) |
19.2 x 50.7 x 127.3 (mm) |
|
Weight |
100 g (with battery) |
Okayo LT-200+ — Induction Loop Controller
Induction Loop Controller
1. Interface
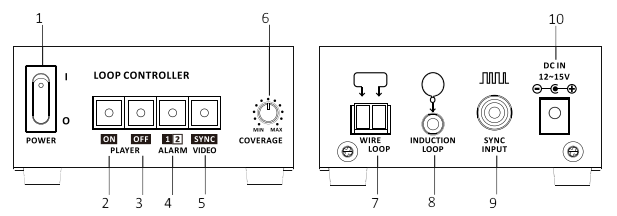
- Power Switch
- Player Power On Function
- Player Power Off Function
- Alarm Switch
- Audio/Video Sync Mode Function
- Knob for power/range adjustment
- Loop Terminal Sockets
- Loop Socket
- Audio Sync Input
- DC-IN Power Adapter Socket
2. Installation
- Connect power to the device.
- Build a trigger zone using the supplied loop cable.
- Turn on the power (1) and set the desired trigger function (2-5).
3. Player Power On / Off Function
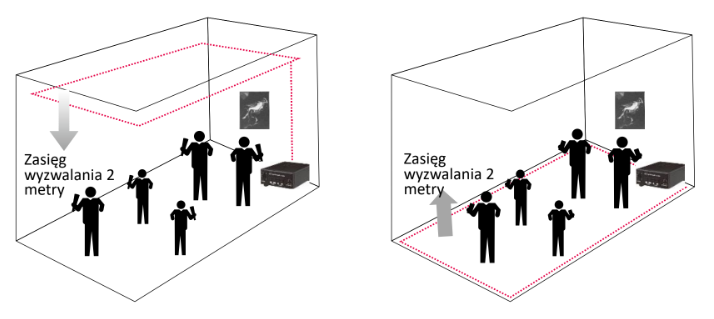
- PLAYER [ON] : Press and hold [ON] for 2 seconds until the LED lights up RED. Devices will start automatically upon entering the trigger zone.
- PLAYER [OFF]: Press and hold [OFF] for 2 seconds until the LED lights up RED. Players will be turned OFF automatically upon entering the trigger zone.
- ALARM [1|2] : Press and hold [1|2] for 2 seconds until the LED lights up RED. 2 (two) alarm options are available for devices, which will start beeping upon entering the activation zone.
- VIDEO [SYNC] : Press and hold [SYNC] for 2 seconds until the LED lights up RED. The assigned audio track will start automatically on devices when they enter the activation zone.
4. Video Synchronization
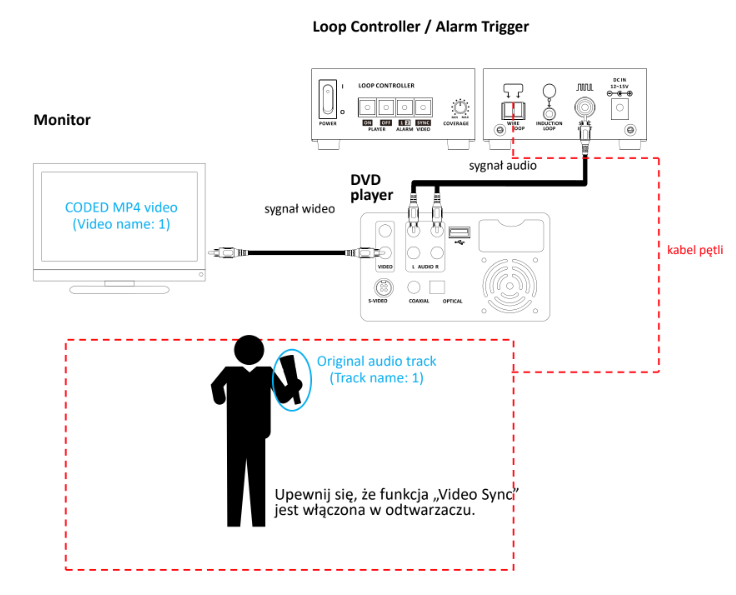
Compile the video beforehand according to the steps below:
- Isolate the audio track from the video and save it as an MP3 audio file.
- Save this MP3 audio file (e.g., as "1") in the player's preferred language folder using the Audio Master software.
- Compile the MP3 file using SWG (please refer to the additional SWG manual) to create "encoded audio."
- Then combine the "encoded audio" with the "original video" to create an "encoded MP4 video." Remember that the name of this video must be changed to be the same as the file number (e.g., video name: 1) as the audio file uploaded to the player.
Configure the device as follows:
5. Installation Example
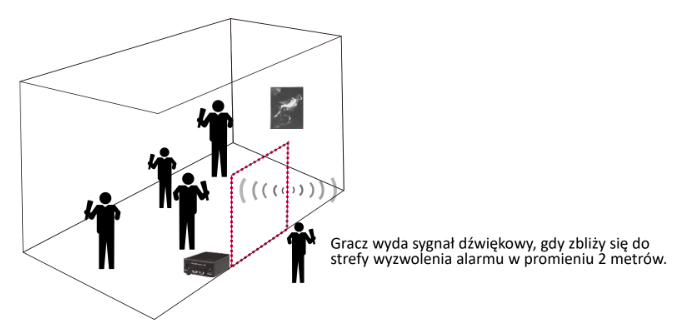
5.1. Setting an alarm at the exhibition exit
5.2. Setting a single antenna in the exhibition hall
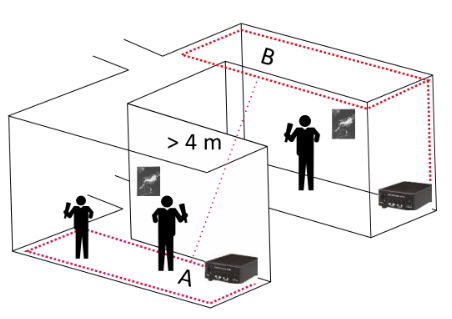
5.3. Multiple loops in the exhibition hall
Antennas A and B should be at least 4 meters apart.
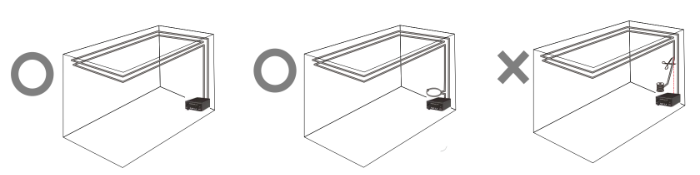
- For limited range, connect the induction loop using connector (8) and adjust the range with knob (6) if necessary.
- For long range, connect the loop cable with connector (7) and adjust the range with knob (6) if necessary.
- Use the loop cable (approx. 35 meters) included in the device packaging for best performance. Do not cut it.
6. Specification
| Parameter | Value |
|---|---|
|
Modulation |
ASK 100% |
|
Power Supply |
12-15 V / 3.3A |
|
Range |
approx. 2 meters (line of sight) |
|
Ambient Temperature |
-10°C ~ 50°C |
|
Dimensions (L x W x H) |
117 x 88 x 44 (mm) |
|
Weight |
385 g |
Okayo OMG-25U+VS — Bulk Charger
Desktop Charger
1. Interface
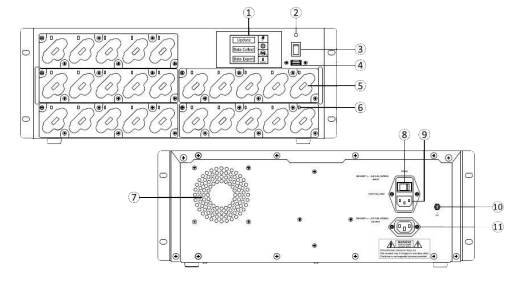
- 2.8” Touch Screen
Charging Mode (⚡︎)
Settings Mode (⚙︎)
Program Mode ( )
)
Update Mode (⤓) - Power Indicator
- DC Power Switch
- Update Port
- Charging Socket
- Status Indicator
Charging (⚡︎) / Settings (⚙︎) / Program () Mode:
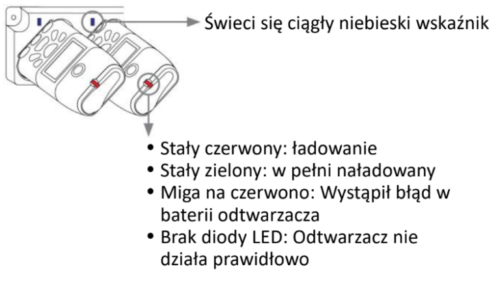
– Solid Blue: player is correctly inserted into the slot.
– No LED: player is not correctly inserted into the slot.
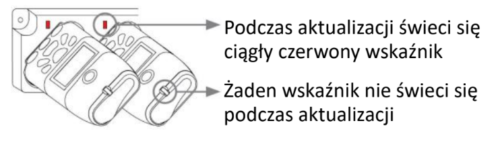
Update Mode (⤓):
– Solid Red: player is being updated.
– Flashing Red: an error occurs during update.
– No LED: player is exempt from update. - Fan
- AC Power Switch
- Power Consumption
- Grounding
- Power Output
1.1. Charging
1.1. Update
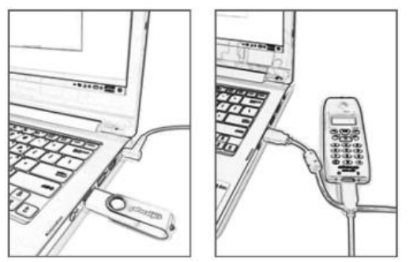
Step 1.
First, compile the audio content using Audio Master 3 (VS) software and upload the project to a USB storage device or OmniGuide via transfer cable.
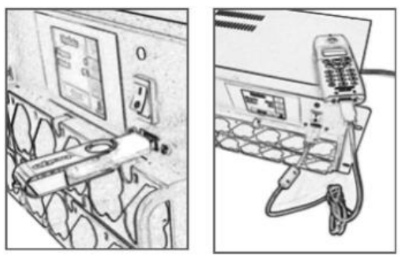
Step 2.
Connect the uploaded USB storage device or OmniGuide via transfer cable to the OMG-25U+VS updater to update the content.
2. Operation
2.1. Turn on the power
- Connect the power cord to the mains.
- Turn on the power from the back.
- Turn on the DC power from the front, and the power indicator will light up red.
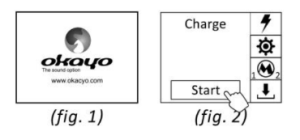
- The default power-on screen appears (Fig. 1).
- After the updater is initialized, the default standby screen appears (Fig. 2).
2.2. Charging Mode
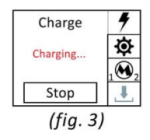
- The default standby screen is in charging mode (⚡︎).
- Press "Start" to begin charging (Fig. 2).
- Press "Stop" to interrupt charging at any time if necessary (Fig. 3).
⚠ Note
When the updater is turned on, the screen shows the status of the last charge.
When the updater is charging, the update mode will not be available.
2.3. Settings Mode
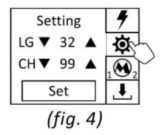
- Press the ⚙︎ symbol to enter settings mode.
- Press ▲▼ to select the preferred language (LG) or channel (CH).
Two settings can be configured here.
1. Language (LG): A maximum of 32 languages can be set.
2. Channel (CH): The number of channels varies depending on the band of OMG-100T and OMG-100R. - Press "Set" to start adjusting the settings (Fig. 4).
⚠ Note
The screen shows the last setting upon first entering this mode.
Only languages (LG) that are available for players can be set.
Channel (CH) adjustment will only be available for OMG-100T/R. OMG-100/101 are not available.
2.4. Program Mode
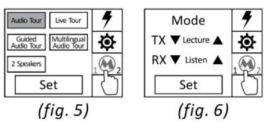
- Press the symbol to enter programming mode.
- Default Mode 1 (Fig. 5) appears when selecting an application. The table below lists the different OmniGuide modes that will be set for each application.
| Application | OMG-100T | OMG-100R |
|---|---|---|
|
Audio Tour |
Player |
Player |
|
Live Tour |
Live |
Listen |
|
Guided Audio Tour |
Guide |
Listen |
|
Multilingual Audio Tour |
Leader |
Guest |
|
2 Speakers |
Lecture (M/S) |
Listen |
- If none of the above applications are preferred, press the symbol again to switch to Mode 2 (Fig. 6) for personal customization.
| Model | 1 | 2 | 3 | 4 | 5 |
|---|---|---|---|---|---|
|
OMG-100T |
Player |
Guide |
Leader |
Live |
Lecture |
|
OMG-100R |
Player |
Guest |
Listen |
- |
- |
- Press "Set" to start the adjustment.
⚠ Note
Different options are only available for OMG-100T and OMG-100R.
The above screen will appear for 5 seconds if “2 speakers” in Mode 1 or “Lecture” in Mode 2 are selected and set.
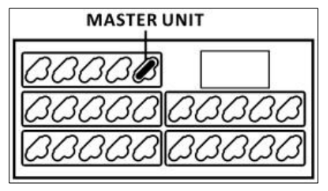
- The OMG-100T placed in the indicated slot will be set as the main unit (Lecture M), while the other slots will be subordinate units (Lecture S).
2.5. Update Mode
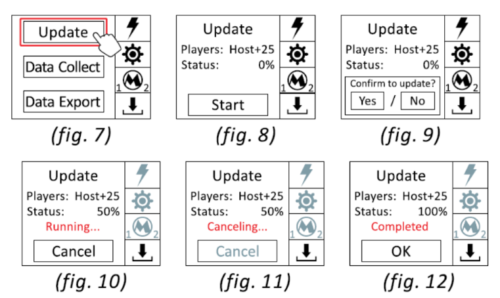
- Press the ⤓ symbol and "update" to enter update mode (Fig. 7).
- Connect the USB storage device, which means Host on the screen with the updater.
- The number of players (e.g., 25) appears after Host when players are correctly inserted into the slots.
- Press "Start" to begin the update (Fig. 8).
- Press "Yes" and the update is in progress (Fig. 9).
- Press "Cancel" to stop the update at any time if necessary (Fig. 10 and 11).
- Press "OK" when the update is complete (Fig. 12).
- To return to the main ⤓ screen, press the ⤓ symbol again.
⚠ Note
Ensure that the USB storage device has the correct audio content edited by Audio Master 3 (VS).
During the update, other modes will not be available.
Keep players connected during the update to avoid a failed update.
Audio content saved on the USB storage device or host player will also be transferred and saved during the first update. Therefore, it is recommended to remove the USB storage or host player from the updater after the first update (if the same audio content is required).
2.6. Data Collection Mode
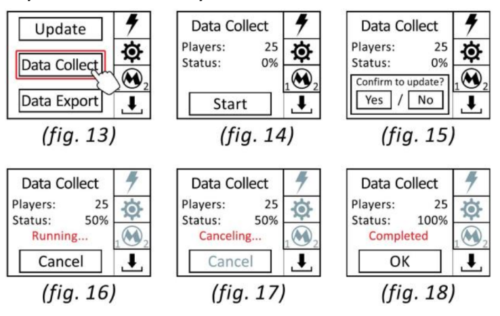
- Press the ⤓ symbol and "Data Collect" to enter data collection mode (Fig. 13).
- Insert all players into the slots, and the total number of players (e.g., 25) will appear on the screen (Fig. 14).
- Press "Start" to collect data from the players to the updater (Fig. 14).
- Press "Yes" and data collection is in progress (Fig. 15 and 16).
- Press "Cancel" to interrupt data collection at any time if necessary (Fig. 16 and 17).
- Press "OK" when data collection is complete (Fig. 18).
- To return to the main ⤓ screen, press the ⤓ symbol again.
⚠ Note
Player data will be automatically cleared after being collected and saved in the updater.
It is recommended to collect and save all data in the updater beforehand to export it to a USB storage device in one go.
2.7. Data Export Mode
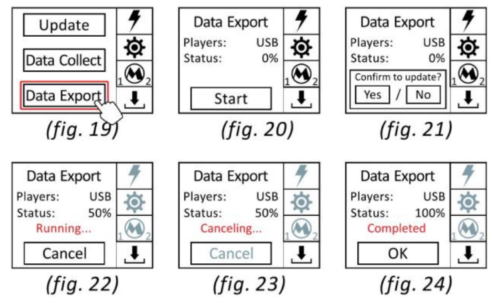
- Press the ⤓ symbol and "Data Export" to enter data export mode (Fig. 19).
- Connect the USB device to the updater, and "USB" will appear on the screen (Fig. 20).
- Press "Start" to export data from the updater to the USB storage device (Fig. 20).
- Press "Yes" and data export is in progress (Fig. 21 and 22).
- Press "Cancel" to interrupt the export at any time if necessary (Fig. 22 and 23).
- Press "OK" when data export is complete (Fig. 24).
- To return to the main ⤓ screen, press the ⤓ symbol again.
⚠ Note
All original files (except the okayo file) saved on the device will be deleted during export.
Files named EXP01 ~ EXP99 (max. 99) for each export will be created sequentially on the USS storage device.
⚠ Note
All 99 data files will be cleared if the USB storage device is full, and then a new file named EXP01 will be created. Therefore, it is recommended to regularly remove files from the USB storage device. To learn more about okayo data analysis, please refer to the Data Master 2 manual separately.
2.8. Powering Off
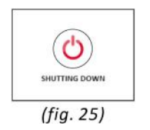
- Turn off the DC power from the front, and the power indicator will turn off.
- The default power-off screen (Fig. 25) will appear, and the updater will be successfully turned off.
⚠ Note
If the AC power from the back is turned off, the updater will shut down directly without displaying the above default power-off screen.
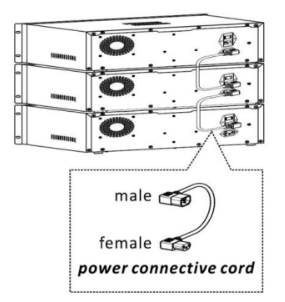
3. Installation for Multiple Updaters
- Below we show how to connect and expand updates on demand.
- Max. 3 updaters can be connected!
4. Troubleshooting
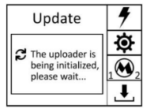
Updater initialization is not yet complete. Please wait until this screen disappears after initialization is finished.
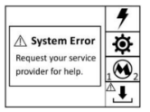
Cannot turn on the updater.
1. Turn off and then turn on the AC power from the back again to check if the problem is resolved.
2. If the above solution cannot resolve the problem, reinsert the SD card into the updater.
3. If the problem persists, return the updater to the supplier.
Why was no data file created on the USB storage device after exporting data from the updater?
No data in the updater.
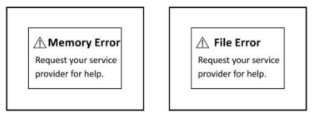
An SD card error occurred inside the updater.
1. Remove and reinsert the SD card into the updater.
2. If the problem persists, return the updater to the supplier.
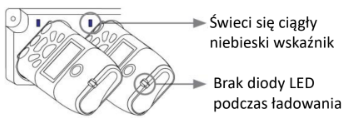
The player is not correctly inserted into the updater slot.
1. Disconnect and reconnect it to the updater to check if the problem is resolved.
2. If the above solution cannot resolve the problem, return the player to the supplier.
OFF DESK
When you see the above screen shown on the player, insert it into the updater to release the alarm.
⚠ Note
If the updater is in update mode, the player's anti-theft system will also be disabled when the alarm is triggered.
5. Technical Specification
| Parameter | Value |
|---|---|
|
Charging Pockets |
25 |
|
Data Transfer Rate |
>7 MB/s |
|
Charging Current |
650±30 mA |
|
Charging Time |
4 - 5 hours |
|
Number of Connected Chargers |
3, in series connection |
|
Input Power |
AC 100-240 V, 50/60 Hz, 4.8-2.4 A |
|
Output Power |
AC 100-240 V, 50/60 Hz, 3.2-1.6A |
|
Operating Temperature |
0 ~ 40°C |
|
Dimensions (L x W x H) |
236 x 484 x 177 mm |
|
Weight |
8.5 kg |