



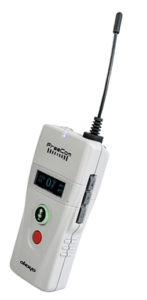
Okayo FreeCom
1. System Characteristics
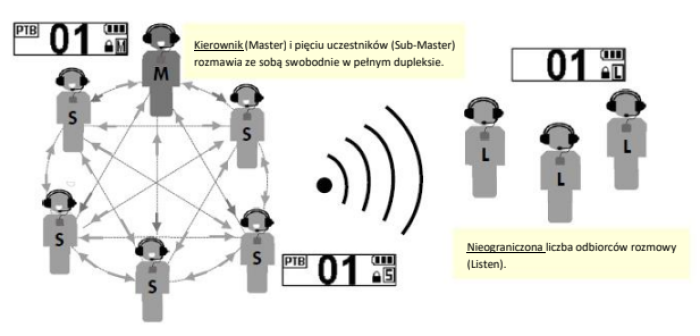
Okayo FreeCom is a full-duplex communication system that enables simultaneous conversation between 1 Master and 5 Sub-Masters.
Three operating modes are available for the FC-6:
- MASTER Unit ‒ For the team leader. Required to create a group. Only one (1) MASTER per group.
- Sub-Master Unit ‒ For team members. Unlimited number of Sub-Masters in a group, but only 5 units can transmit at the same time.
- Listen Unit ‒ For listeners. Unlimited number in a group.
2. Interface
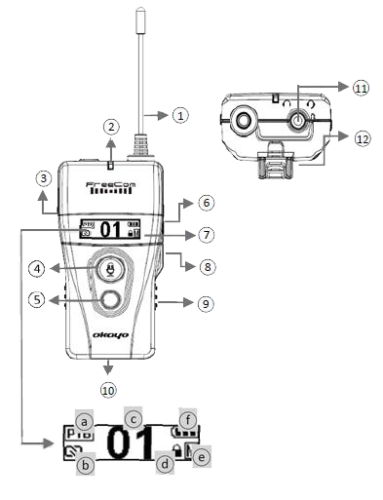
- Antenna
- LED Indicator
- 3.5 mm (TRS) Audio Input
- Talk / Mute Button
- M Button (Master Priority)
- Up / Down (▲▼)
- OLED Display
- Power Button
- Battery Compartment (AA x 2)
- Charging Contacts
- Headset Socket
- Belt Clip, Lanyard Hook
- Microphone Mode (PTB, PTT, PTM)
- Encrypt ON (Encryption)
- Channel Number
- Channel Lock
- Intercom Mode (M, S, L)
- Battery Level
3. System Operation
3.1. Creating an (Encrypted) Group
First Step – Create the MASTER Unit. Press and hold the M and power buttons simultaneously to create a Master intercom. The last used communication channel will appear flashing on the display. Press the ▲▼ button to select a different channel. Confirm the new channel by pressing the power button. Then the "Encrypt" message will appear on the display. Press the ▲▼ button and select whether to encrypt the channel (ON for yes; OFF for no). Press the power button or wait 5 seconds to confirm. The LED will start flashing rapidly (Encrypt OFF – blue, Encrypt ON – purple). The Master unit is ready and transmitting a pairing signal. Do not press any buttons on the Master at this point.
Second Step ‒ Create Sub-Master Units. Press and hold the power button until the intercom turns on. The same channel number as the Master will appear on the display. If a different channel number appears on the display – turn off and restart the device. At this point, the Sub-Master units have been created.
Third Step ‒ Activate Listen Units (if necessary). Press and hold the Down ▼ and power buttons simultaneously until the intercom turns on. The "Mode" message will appear on the display, then select "Listen" mode using the Up/Down ▲▼ buttons. Press the power button to confirm the selection. The same channel number as the Master will appear on the display (the symbol indicates Encrypt ON). At this point, the Listen units have been created.
Final Step ‒ Your (Private) Group is Ready! When all Sub-Master and Listen units have been paired, briefly press the M priority button on the Master to complete device pairing.
⚠ Remember
Your group channel is secured and cannot be changed during intercom operation if it is encrypted (Encrypt ON).
3.2. Microphone LED in Sub-Master Units
Below are three different microphone LED (4) statuses for Sub-Master intercoms.
 Green Microphone: Microphone is on
 Red Microphone: Microphone is muted
 Off Microphone: Microphone cannot be turned on at this time
⚠ Remember
An unlimited number of Sub-Master and Listen intercoms can be in an (encrypted) group, but a maximum of five Sub-Masters have the right to speak at the same time.
3.3. Changing the Transmission Channel
All intercoms in an open group (Encrypt OFF) can manually change their group channel. Press and hold the Up ▲ and Down ▼ buttons simultaneously for approximately 5 seconds until the 🔒︎ symbol disappears from the display. Then press the ▲▼ buttons to change the channel. Confirm the newly selected channel by pressing the power button or wait 1 second.
3.4. Activating Master Priority
The Master intercom can activate this function by pressing and holding the M button for approximately 3 seconds. All Sub-Master intercoms on the channel will be muted. The MP symbol will appear on the displays of all devices in the group until the Master unit disables this function by briefly pressing the M button.
3.5. Adjusting Headset Volume
Press the Up ▲ or Down ▼ button to increase / decrease the headset volume level during group communication.
⚠ Remember
Receiving sound at the highest level for an extended period may cause hearing damage.
3.6. Connecting an External Audio Source
An additional audio source can be connected to the Master and Sub-Master intercoms via the 3.5 mm Aux-in jack on the left side of the device.
3.7. Turning Off the Intercom
There are three ways to turn off the intercom:
- Press and hold the power button for 2 seconds.
- Sub-Master and Listen intercoms will automatically turn off after 20 minutes without receiving a signal from the Master intercom.
- When encryption is enabled (ENCRYPT ON), all intercoms in the group will turn off at the same time as the Master unit is turned off.
4. LED Indicator
| LED Status | Meaning |
|---|---|
|
Blue |
Encryption Disabled |
|
Purple |
Encryption Enabled |
|
Red |
Low Battery Level |
|
Solid |
Stable Signal Reception |
|
Flashing Slowly |
No Signal |
|
Flashing Rapidly |
Device Pairing |
5. Application Example
6. Settings Panel
Settings are available manually when the device is turned off. Turn on the intercom by simultaneously pressing and holding the Up ▲ and power buttons. Then use the Up ▲ and Down ▼ buttons to scroll through the menu and change settings. Press the power button to confirm each selection. The device will exit the settings panel automatically after all settings have been selected.
| Function | Setting |
|---|---|
|
Microphone |
PTB, PTT, PTM |
|
Microphone Sensitivity |
1, 2, 3 |
|
Signal Power |
Hi (High), Low |
|
Aux-in Socket Priority |
ON, OFF |
|
Headset Socket |
Regular, HAC Level |
7. Troubleshooting
No Sound
- Ensure that the sound level is set correctly.
- Ensure that the headset / headphones are properly connected to the device.
- Ensure that the group channel is set correctly.
- You do not have permissions in the encrypted group.
Cannot Speak in the Group
- Ensure that the headset is properly connected to the device.
- Ensure that the intercom is in TRX mode.
- Ensure that the Master has not activated the priority function.
- Ensure that the Talk/Mute button LED is green. If not, wait until one of the Sub-Masters releases "talk right".
8. Technical Specifications
| Parameter | Value |
|---|---|
|
Frequency Band |
863 MHz ~ 865 MHz |
|
Channel Frequency |
864.50, 863.50, 864.00, 863.25, 863.75, 864.25, 864.75 |
|
Modulation |
4GFSK |
|
Number of Channels |
7 |
|
Simultaneous Full-Duplex Communication |
Up to 6 Users |
|
Latency |
< 25 ms |
|
T.H.D. |
< 7% |
|
Frequency Response |
300 Hz ~ 4500 Hz |
|
Signal Power |
Low - 10 mW |
|
RF Output Power |
10 dBm |
|
Power Requirements |
2x AA Alkaline 1.5V |
|
Battery Life |
20 ~ 24h |
|
Battery Charging Time |
6 ~ 8h |
|
Transmission Range |
Over 100 m in Line of Sight |
|
Dimensions |
46.5 x 29 x 165 mm (including antenna and belt clip) |
|
Weight |
55 g (without batteries) |