



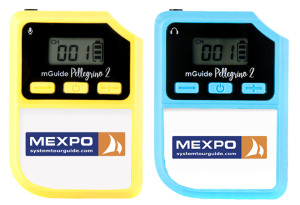
mGuide Pellegrino 2
Instructions
Operating Instructions for Accessories
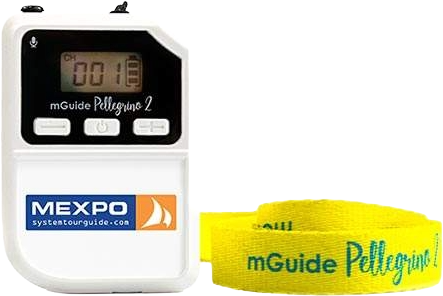
mGuide MP2-SKC
General Instructions
1. Before starting the tour guide system
- Ensure that a microphone or headset is connected to the transmitter, and an earphone to the receiver. Check that the microphone/headset/earphone plug is properly inserted into the jack.
- Ensure that disposable batteries are correctly inserted or Ni-MH rechargeable batteries are charged (+ to +, - to -) into each device. For systems with a built-in battery, check its charge level.
2. Correct startup of the tour guide system
- Start by turning on the transmitter (or transmitters, in the case of a system that allows more than 1 transmitter to operate on the same channel) and selecting the desired transmission channel.
- If the transmitter has a microphone sensitivity adjustment setting, check that it is not too low. This also applies to the "mute" function.
- Next, turn on all receivers. The transmission channel should be set manually or via channel synchronization (if available in the model) to the same channel as the transmitter.
- Check that the volume on the receivers is not too low.
⚠ Note
Most popular tour guide systems only allow 1 transmitter to operate on 1 channel. Operating 2 transmitters on the same channel will cause interference or no transmission.
3. Power management of the tour guide system
3.1. Disposable batteries
- One battery bar on the display or a red LED on the device indicates a low battery level. At this point, the batteries should be replaced with new ones, as the device will operate for a maximum of 1 hour.
- If the batteries discharged too quickly, insert new ones and check their operating time, or you can try using batteries from a different manufacturer.
- Low or high temperatures can affect battery life.
3.2. Rechargeable and built-in batteries
- One battery bar on the display or a red LED on the device indicates a low battery level. At this point, the device should be placed in the charger (if the device has a micro USB input, it can be charged via a USB cable).
- Devices with rechargeable batteries are best charged 1 day or a few hours before planned use.
- The charging time for rechargeable batteries in a special charger depends on the model and the discharge level of the battery. For a completely discharged battery, the charging time ranges from approximately 5 hours to 12 hours for the highest capacity batteries. Leaving devices in the charger overnight does not cause overcharging or any damage to the equipment.
- It is important to periodically replace worn-out rechargeable batteries with new ones. Depending on the manufacturer and capacity of the batteries, cycles (cyclic discharge and charge) can range from 500 to 1500.
⚠ Note
It is not recommended to connect more than one charger to an extension cord.
4. Transmission interference / no transmission - possible solutions
- Check if the transmitter/receiver is turned on.
- Check if the transmitter and receiver are on the same channel.
- Check if the transmitter/receiver is not muted.
- Check if 2 transmitters are not operating on the same channel.
- Check the transmission quality on another channel.
- Check if the microphone/headphones are not damaged – test the receiver with an earphone and the transmitter with a microphone that you are sure are working correctly.
- Check if the battery is not discharged – test the device with a battery/rechargeable battery that works in another device (you are sure it is not discharged).
- Restart the tour guide system (turn it off and on again).
mGuide Pellegrino 2 User Manual
1. Device Diagram
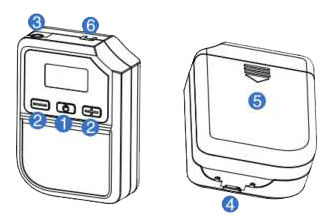
Transmitter
- Power on / off / mute
- Channel up / down
- Microphone input
- Micro-USB charging port
- Battery compartment, two AA batteries
- Lanyard attachment point
Receiver
- Power on / off
- Channel and volume adjustment
- Headphone jack
- Micro-USB charging port
- Battery compartment, two AA batteries
- Lanyard attachment point
2. Liquid Crystal Display and Illustration
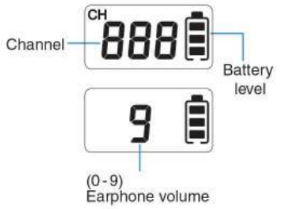
|
Icon |
Transmitter |
Receiver |
Icon |
Transmitter |
Receiver |
|---|---|---|---|---|---|
|
|
Change channel |
|
- |
No signal reception |
|
|
|
Mute |
|
Full battery |
||
|
|
- |
Headphone volume |
|
Empty battery |
|


User Manual
3.1. Connecting the microphone and headphones
Connect the microphone to the 3.5 mm jack on the transmitter, and the headphones to the 3.5 mm jack on the receiver. Ensure that the plugs are properly inserted.
3.2. Powering on/off
- Press and hold the power button ⏻ for two seconds to turn the system on and off.
- The power-saving receiver will automatically turn off if it does not receive any signal within 20 minutes.
3.3. How to select a channel
- The default channel is 001. If you want to select a different channel, press - and + simultaneously for two seconds. CH will start flashing. Press the - / + buttons to select the channel.
- Briefly press ⏻ to confirm the selected channel or wait approximately 10 seconds for the selected channel to be automatically saved.
⚠ Note
Ensure that the transmitter and receiver are operating on the same channel. The receiver display will flash if it does not receive any signal from the transmitter (see Q&A – question no. 2)
Channel memory
- The mGuide Pellegrino 2 can automatically remember the channel number. When turned on again, it will set itself to the last selected channel.
- Channel synchronization – automatic channel synchronization between the transmitter and receiver. Due to interference or other factors requiring channel changes, the system provides an easy way to synchronize the entire group to a new channel. Ensure that the transmitter and receiver are on the same channel and are connected. Changing the transmitter's channel will also wirelessly synchronize the receiver's channel.
3.4. Volume adjustment
Transmitter
Press the power button ⏻ to mute the transmitter; press it again to resume operation. When the device is muted, 0 will flash.
Receiver
Press - / + to adjust the volume. The display will show the new volume level from 0 (muted) to 9 (maximum), then automatically return to showing the channel number after a moment. If set to 0, the receiver will be muted, and 0 will remain on the screen as a volume level indicator.
Volume memory
The mGuide Pellegrino 2 can automatically remember the volume level. When turned on again, it will set itself to the last selected value.
3.5. Battery autonomy
- A new or fully charged battery will provide a continuous operating time of approximately 32 hours for the receiver and 24 hours for the transmitter. Actual battery life depends on user settings, usage patterns, environmental conditions, battery manufacturer, and other factors.
- If the battery icon is empty and flashing, the batteries should be replaced immediately or recharged (if using a rechargeable battery).
3.6. Battery replacement
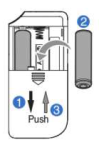
Step 1: Open the battery compartment cover
Step 2: Replace with two new AA batteries (ensure correct polarity).
Step 3: Close the battery compartment cover.
3.7. Recharging batteries
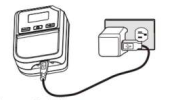
- Recharge the batteries immediately using an appropriate USB charger and a USB to micro-USB cable.
- The charging current is set to approximately 255 mA to prevent overcharging; a built-in timer switches off charging after 16 hours of charging.
⚠ Note
Do not attempt to recharge ordinary batteries. !!
3.8. Restarting the device in case of display freeze
If the system freezes and does not respond to commands, you can try to force it to shut down by removing the batteries, then reinserting them and restarting the system.
4. Questions and Answers
- 0 is displayed on the transmitter.
Check if the volume has not been reduced. - The content on the receiver display is flashing.
This means that no transmitter signal is being received. Ensure that the transmitter is turned on and that the receiver is within normal reception distance. The transmitter and receiver must operate on the same channel and frequency.
⚠ Note
To ensure proper signal reception, place the transmitter and receiver approximately 10-30 cm apart. If the devices are too close to each other, the signal reaching the receiver will be immediately saturated; the system will then refuse to operate, and the receiver will mute.
Instructional Videos
mGuide MP2-SKC Synchronizer
1. Device Diagram
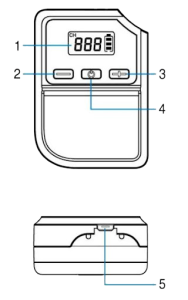
- LCD Display
- Channel down button
- Channel up button
- Power button
- Synchronization interface and Micro-USB charging port
1.1. LCD Display
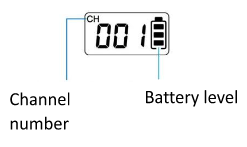
2. Synchronization Process
- Connect the DCH-12U/24U charger to the power supply.
- Place the mGuide Pellegrino2 receivers/transmitters in the charger. Leave one free slot in the charger for the mGuide MP2-SKC synchronizer.
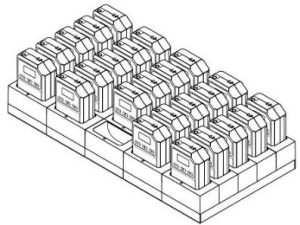
- Then, turn on the mGuide MP2-SKC by pressing and holding the power button (4) for approximately 3 seconds.
- After turning on the synchronizer, select the channel synchronization mode:

2.1. Off mode – mGuide Pellegrino 2 devices will automatically turn off after synchronization.
- Use the - and + buttons (2, 3) to select the desired channel on which the devices should operate.
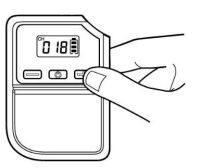
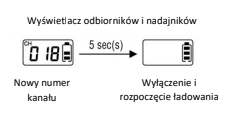
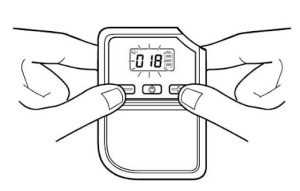
- Press and hold the - and + buttons simultaneously for approximately 3 seconds to confirm the selected channel (the LCD Display should stop flashing).
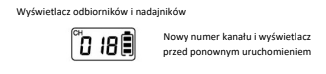
2.2. On mode – mGuide Pellegrino 2 devices will automatically turn on after synchronization.
- Use the - and + buttons (2, 3) to select the desired channel on which the devices should operate (the LCD screen should continue to flash).
- After selecting the channel synchronization mode, place the mGuide MP2-SKC in the free slot in the charger. The LCD displays on the devices will flash rapidly (approx. 5 times). Then the flashing will stop, indicating a successful channel synchronization process in the mGuide Pellegrino 2 devices.
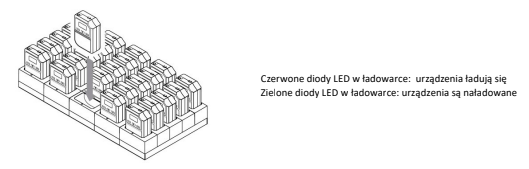
- 5 minutes after synchronization is complete, the mGuide MP2-SKC will automatically turn off and begin charging if it remains in the charger.
⚠ Note
The mGuide MP2-SKC can be removed from the charger immediately after channel synchronization is complete and turned off by pressing and holding the power button (4) for approximately 3 seconds.