


mGuide GST
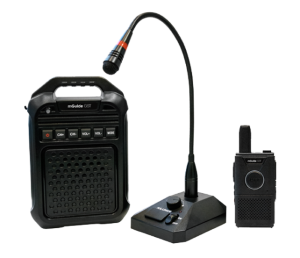
Instructions
mGuide GST G1
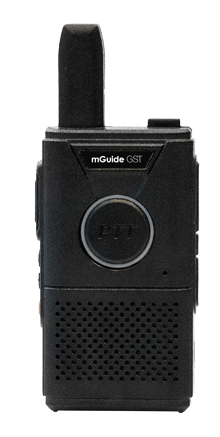
mGuide GST G2
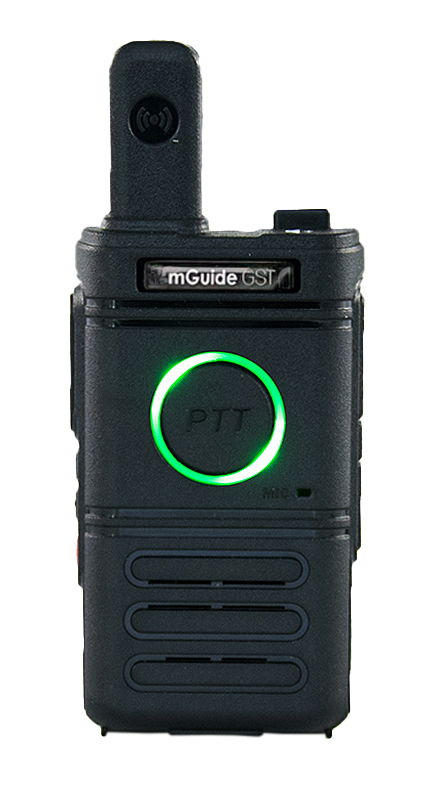
mGuide GST G3
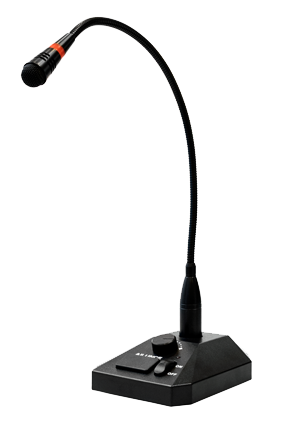
mGuide SM-01
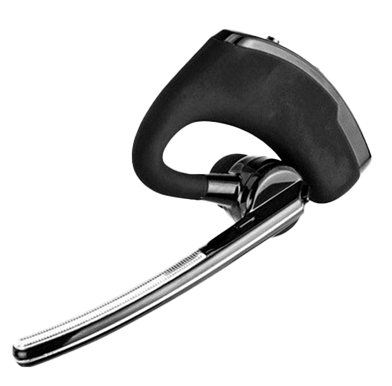
Headset GST-BT
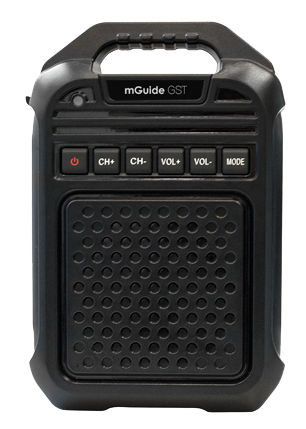
mGuide GST G1
Warning
Before programming the radio, please read the programming instructions first.
Before modifying the frequency using the software, read the data from the radio and save these settings as a default file, then program the radio according to your preferences and save a new code file; otherwise, errors may occur.
You can program the radio to set frequency, channel type, CTCSS/DCS, RF power, etc.
Your software must comply with FCC, CE (or other national) certifications.
0. Functions and Features of the GST G1 Radio
- PMR 446 analog direct mode, 16 available channels, wide and narrow band interval, with sub-audio signaling,
- monitoring, scanning, encryption, busy channel lockout, companding, and other auxiliary functions,
- for FM radio function, press the channel button to switch freely between radio stations,
- Bluetooth connection, wireless transmission distance can reach 10 meters, audio playback from mobile phone or other source,
- equipped with a main USB Type-C interface for programming, file reading and writing, and external power supply,
- TF card support for audio playback, supports MP3, WMA, WAV - 3 file formats in total, supports single loop,
- high-performance, internal magnetic speaker, maximum peak power 10W - clear, crisp, and loud sound,
- voice transmission and voice prompts,
- patented design, small size, comfortable grip, easy to carry with the option of wireless operation on 6 x AA power.
1. Basic Information
1.1 Contents
Two-way radio station GST G1 x 1, 12V AC adapter x 1, speaker microphone x 1
1.2 Device Diagram
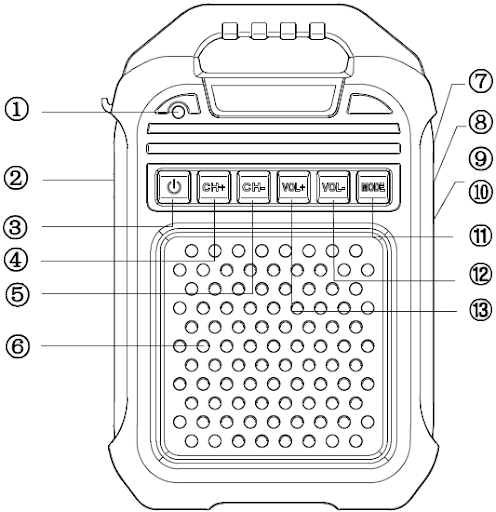
- Transmit/Receive Indicator
- 1x 2.5 mm & 1x 3.5 mm Jack *
- Power On / Off Button
- Channel Change Button [CH+]
- Channel Change Button [CH-]
- Built-in Speaker
- TF Card Slot
- DC Power Jack
- AA Battery Compartment (6 pcs) **
- USB C Socket ***
- [MODE] Button
- Volume [VOL-] Button
- Volume [VOL+] Button
* The jack is used to connect external accessories (speaker microphone / desktop microphone) and to connect the programming cable.
** Use a small screwdriver to unscrew and place 6 AA batteries in the compartment. Then screw the screw back in.
*** The socket can be used to connect a programming cable and for external power supply.
1.3 Button Functions
|
Button |
Name |
Function |
|---|---|---|
|
|
Power On / Off Button |
Press and hold for 2 seconds to turn on or off; in Bluetooth/TF card mode, short press to pause playback, short press again to resume playback. |
|
|
Channel Up / Next Track |
Channel Mode: up button to switch channels; |
|
|
Channel Down / Previous Track |
Channel Mode: down button to switch channels; |
|
|
Volume + |
Short press the volume up button. Holding it down during playback will signal with a sound when the maximum level is reached. |
|
|
Volume – |
Short press the volume down button. Holding it down during playback will signal with a sound when the minimum level is reached. |
|
|
Mode Selection Button |
Short press to switch: channel mode → FM mode → Bluetooth/TF card → channel mode. Long press (2s) in channel mode activates monitoring. |
|
|
PA Speakerphone Mode |
Press and hold simultaneously to enter/exit gain mode (requires connected microphone). |
|
|
Single Loop |
In TF card mode, press and hold simultaneously to enter/exit single track repeat mode. |


2. General Operating Principles
2.1 Turning the Device On / Off
- Connect the power adapter to the mains, then to the device.
- Press and hold the power on / off button (3) for 3 seconds to turn on the device.
- Press and hold the power on / off button (3) for 3 seconds to turn off the device.
2.2 Channel Selection
- Press the channel change button [CH+] or [CH-] to select the desired channel.
⚠ Note
For communication, a minimum of 2 users must be on the same channel.
2.3 Transmit/Receive Indicator
- Green light flashes when the radio receives a transmission. Red light flashes when the radio transmits.
2.4 PTT (Push-To-Talk) Communication
- Connect an external microphone to the G1 station jack (2).
- Press and hold the PTT button on the microphone to transmit (speak).
- Release the PTT button to receive (hear the other user).
⚠ Note
To ensure the best reception volume, maintain a distance of 2.5 cm ~ 5 cm between the microphone and your mouth during transmission.
2.5 Volume Adjustment
- After powering on, press the [VOL+] button to increase volume and press the [VOL-] button to decrease volume.
2.6 Changing Operating Mode
- The operating mode can be switched using the [MODE] key: channel mode, radio mode, TF card/Bluetooth.
3. Main Functions
3.1 Monitoring, FM Radio, Bluetooth / TF Card, PA
- See section Button Functions.
4. Troubleshooting
Device does not turn on [power adapter].
- The power adapter is incorrectly connected. Disconnect and reconnect.
- The power adapter is damaged. Disconnect it and contact your supplier.
Device does not turn on [AA batteries].
- Check if the AA batteries are correctly placed in the compartment.
- Replace AA batteries with new ones (for Ni-MH AA cells, remove them from the compartment and charge externally).
- Poor contact due to dirty or damaged battery contacts. Wipe the battery contacts in the compartment with a dry cloth. If this does not help, remove the batteries from the compartment and contact your supplier.
Intermittent or quiet sound / poor sound quality when receiving a signal.
- AA battery voltage is too low. Replace them with new ones.
- Quiet sound. Increase the volume using the [VOL+] button.
- Dirty or damaged speaker. Wipe the device with a dry cloth. If this does not help, contact your supplier.
Cannot talk to other users.
- Check if the channel frequency and DEC / ENC settings you are using are the same for other group members.
- Check if you have channel mode set. You change the operating mode with the [MODE] button.
- Check if the transmission range is within the effective range of the radio.
Hearing another conversation on the channel (not group members).
- Change the DEC / ENC settings for all radios in your group.
- Try setting Scramble to YES.
Noise in audio reception.
- The distance between other users is too great. Reduce the distance between devices.
- Poor location, e.g., many physical obstacles. Try changing the location and turn the device on again.
- Influence of external environment or electromagnetic interference. Avoid equipment or environments that may cause radio transmission interference.
5. Technical Specification
|
General Specification |
|
|---|---|
|
Frequency |
446.00625 MHz ~ 446.19375 MHz |
|
RF Output Power |
⩽ 0.5 W |
|
Number of Channels |
16 |
|
Channel Spacing |
Wide: 25 kHz / Narrow: 12.5 kHz |
|
CTCSS / DCS |
50 CTCSS / 105 DCS |
|
Operating Temperature Range |
-20 ℃ ~ +60 ℃ |
|
Storage Temperature Range |
-40 ℃ ~ +85 ℃ |
|
Power Supply Type |
DC 12 V / 6x AA Alkaline 1.5 V / 6x Ni-MH AA 1.2 V |
|
Standby |
⩽ 20 mA |
|
Receive |
⩽ 450 mA |
|
Transmit |
⩽ 1.4 A @ high power |
|
Speaker-Microphone Connector |
KENWOOD Type (1x 2.5 mm jack & 1x 3.5 mm jack) |
|
USB Connector Type |
TYPE C |
|
Dimensions (L x W x H) |
224 x 147.5 x 79 mm |
|
Weight |
683 g |
|
Transmitter |
|
|---|---|
|
Modulation Mode |
16K0F3E @ 25KHz |
|
Conducted Spurious Emissions |
-36 dBm < 1 GHz |
|
Audio Noise Ratio |
45 dB @ 25 kHz |
|
Rated Audio Distortion |
≤ 5% |
|
Adjacent Channel Power Ratio |
-60 dB @ 12.5 kHz |
|
Modulation Distortion |
5% |
|
Frequency Stability |
± 5 ppm |
|
Modulation Limiting |
± 5.0 kHz @ 25 kHz |
|
Receiver |
|
|---|---|
|
Receive Sensitivity |
0.25 μV (12 dB SINAD) |
|
Adjacent Channel Selectivity |
≥ 60 dB @ 25 kHz |
|
Intermodulation Rejection |
≥ 60 dB @ 25 kHz |
|
Conducted Spurious Response Rejection |
≤ 57 dB @ 25 kHz |
|
Frequency Modulation Noise Ratio |
≥ 45 dB @ 25 kHz |
|
Rated Audio Distortion |
≤ 5% |
|
Audio Output Power |
10 W @ 4 Ω |
|
Audio Range (300 Hz – 3 kHz) |
1 ~ 3 dB |
mGuide GST G2
Warning
Before programming the radio, please read the programming instructions first.
Before modifying the frequency using the software, read the data from the radio and save these settings as a default file, then program the radio according to your preferences and save a new code file; otherwise, errors may occur.
You can program the radio to set frequency, channel type, CTCSS/DCS, RF power, etc.
Your software must comply with FCC, CE (or other national) certifications.
1. Basic Information
1.1 Contents
Two-way radio GST G2 x 1, battery x 1, AC adapter x 1, USB A – Micro USB cable x 1, belt clip x 1, hand strap x 1
1.2 Device Diagram
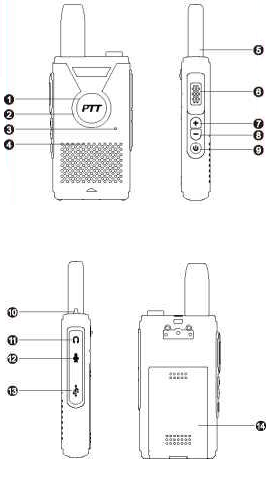
- PTT Button
- LED Indicator
- Built-in Microphone
- Built-in Speaker
- Antenna
- Side PTT Button
- Channel Up Button
- Channel Down Button
- Power On / Off Button
- Volume Switch
- 2.5 mm Headphone Jack
- 3.5 mm Microphone Jack
- Micro USB Jack
- Battery
2. General Operating Principles
2.1 Turning the Device On / Off
- Press and hold the power on / off button (9) for 2 seconds to turn on the device.
- Press and hold the power on / off button (9) for 2 seconds to turn off the device.
2.2 Channel Selection
- Press the channel change button + (7) or – (8) to select the desired channel.
⚠ Note
For communication, a minimum of 2 users must be on the same channel.
2.3 LED Indicator
- Green light flashes when the radio receives a transmission. Red light flashes when the radio transmits.
2.4 PTT (Push-To-Talk) Communication – Built-in Speaker
- The G2 radio has two PTT buttons: front (1) and side (6).
- Press and hold the PTT button to transmit (speak).
- Release the PTT button to receive (hear the other user).
⚠ Note
Keep the radio close to your face to speak and hear clearly.
2.5 PTT (Push-To-Talk) Communication – External Headset-Microphone
- You can connect a headset-microphone with a Kenwood-type connector to the G2 radio.
- Press and hold the external PTT button on the cable to transmit (speak).
- Release the PTT button to receive (hear the other user).
2.6 Volume Adjustment
- To increase the volume, press the volume switch (10) towards you.
- To decrease the volume, press the volume switch (10) away from you.
2.7 Channel Lock
- Press and hold the channel down button – (8) to hear a double beep, and the channel will be locked to the currently set channel.
- Press and long hold the channel down button – (8) to unlock the channel after hearing a "di" sound, and channel changing will be unlocked.
2.8 Low Battery Alarm
- When the battery voltage drops below a specified level, you will hear a "please charge" message, and transmission will be blocked.
2.9 Charging the G2 Radio
- Connect the AC adapter with the USB cable to the mains, then the cable to the Micro USB port on the G2 device.
- The charger is charged via an Android data line. During charging, the LED indicator (2) lights up red.
- When the LED indicator (2) turns off, the radio is charged.
3. Main Functions
3.1 Monitor
- Long pressing the channel up button + (7) activates the G2 radio's receive and monitor function.
- Press and long hold the same button to deactivate the monitoring function.
4. Troubleshooting
No power.
- Make sure your battery is charged. Replace or charge it.
- Make sure the battery is correctly installed in the device.
Battery life is shorter after charging.
- The battery has reached the end of its life. Replace the battery with a new one.
Cannot talk to other users.
- Check if the channel frequency and DEC / ENC settings you are using are the same for other group members.
- Check if the transmission range is within the effective range of the radio.
Hearing another conversation on the channel (not group members).
- Change the DEC / ENC settings for all radios in your group.
- Try setting Scramble to YES.
Radio constantly beeps.
- The radio channel is empty, switch the radio to another channel or save the frequency point before use.
mGuide GST G3
0. Parts List
Radio x1, Battery x1, Adapter x1, Belt clip x1, USB cable x1, Lanyard x1, User manual x1
1. Basic Parameters
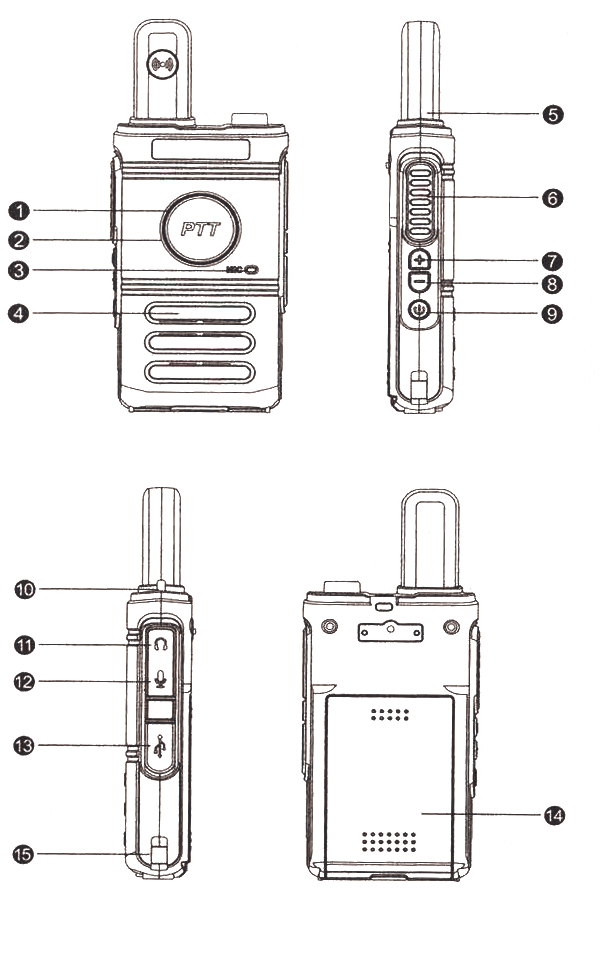
- PTT
- Indicator Light
- Microphone
- Speaker
- Antenna
- Side PTT Button (Transmit)
- Channel +
- Channel -
- Main Power Switch
- Headphone Jack
- Microphone Jack
- USB Jack
- Battery Compartment Cover
- Charger Contacts
2. General Operating Principles
2.1 Indicator
The green LED flashes when the radio receives. The red LED flashes when the radio transmits.
2.2 Channel Switch
Select the desired communication channel within the range of 1-16. Pressing the up button skips to a higher channel; pressing the down button skips to a lower channel and loops.
2.3 Power Switch
Press and hold the power switch for approximately two seconds to turn on the radio. If you need to turn it off, hold the main switch for approximately two seconds.
2.4 PTT Button (Transmit)
The radio has two PTT (Transmit) buttons: one on the side and one on the front. Press the PTT button and move closer to the microphone to communicate with others. The red light will flash. Release the PTT button to enter receive mode – the green light will flash.
2.5 Monitor
Holding the channel up button for an extended period activates the monitor and receive function for a longer time; to deactivate this function, press the button again.
2.6 Squelch Level
2.7 Transmission Timeout
This function prevents channel overload by users who transmit too much; it limits transmission time while protecting the radio from damage caused by prolonged transmission. If the radio transmits beyond the set time (determined by software), it will exit transmit mode and emit a warning sound. To turn off the warning sound, release the PTT button, and the radio will return to receive mode. For excessive transmission, an early warning alarm can be set (configurable via software).
2.8 Scanning
After passing 16 channels, the radio automatically starts scanning.
2.9 CTCSS
See the skip function configurable in the program. CTCSS provides a non-standard tone and increases conversation privacy.
2.10 Voice Selection
Language selection via computer software.
2.11 Power Saving Function
Select to enable or disable the power saving function via computer software.
2.12 Battery Voltage Warning
If the battery voltage drops below a specified level, the device will emit a voice prompt asking to charge, and will prevent transmission.
2.13 Busy Channel Lockout
If busy channel lockout is programmed, the PTT (transmit) button must be pressed to disable transmission after receiving a signal.
2.14 High/Low Power Switch
The default setting is high power. Using computer software, the setting can be switched between high and low power.
2.15 Narrowband (12.5 kHz)
The default radio setting is narrowband.
2.16 VOX
The VOX function is enabled and disabled in the device's computer software. If the radio uses the VOX function, when speaking into the microphone, the voice will be transmitted. When the speaker stops talking, the radio enters receive mode. When using headphones, the VOX sensitivity level should be adjusted to an appropriate level. If the microphone is too sensitive, noise will cause transmission to start. If the microphone is not sensitive enough, the voice will not trigger transmission for communication – it must be adjusted accordingly.
2.17 Encryption
Encryption can be enabled or disabled using computer software. This function allows signal encryption. The device modifies the spectrum to change the transmission range and receives a signal that allows restoration, thus encrypting the transmission.
2.18 QT/DQT
The CTCSS/DCS function can be set using computer software. If channels are set to support CTCSS/DCS, squelch can be activated when receiving a signal with the same CTCSS/DCS characteristics. If the same channel uses different QT/DQT settings, squelch cannot be activated, and the LED will glow green.
- QT: 50 in total
- DQT: 1104*2 in total
2.19 Charging Indicator
Charging occurs via data connection with an Android system. During charging, the indicator glows red.
2.20 Channel Lock Function
Holding the channel down button produces a double beep; the channel is locked to the currently set one. Pressing the channel down button unlocks the channel – after hearing a short 'di' sound; channels can then be switched normally.
3. Troubleshooting
|
Symptom |
Try |
|---|---|
|
No power |
|
|
Battery allows only short-term operation after charging |
|
|
Cannot talk to other group members |
|
|
I hear conversations from people outside the group on the channel |
|
|
Radio still beeps |
The channel is empty; switch to another channel or note the frequency value before use. |
mGuide GST SM-01
1. Information
The SM01 is a traditional desktop microphone that can replace the speaker microphone in a two-way radio.
Improper use of the device may cause damage.
Please follow the recommendations below:
- Please do not expose to prolonged sunlight and keep away from heating devices.
- Please do not drop. A strong impact can damage internal components.
- Do not pull the cable forcefully.
- Keep the volume low to protect your hearing.
- Do not keep it in a humid and dusty environment.
2. Contents
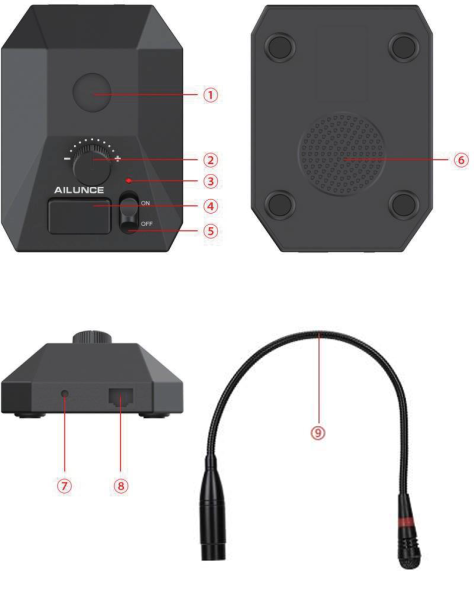
- Microphone Jack.
- Volume knob for the built-in speaker.
- PTT button lock indicator.
- PTT button.
- Lock switch.
- Built-in speaker.
- 3.5 mm connector for foot PTT button.
- RJ45 8Pin network connector.
- Unidirectional gooseneck microphone (45cm).
3. Installation and Operating Instructions
- Connect the microphone to the microphone jack on the desktop unit.
- Connect the included cable with the RJ45 end to the desktop unit, and then the other end (depending on the connector type) to an external device, e.g., a two-way radio.
- Turn on the radio and set its volume level
- Then set the speaker volume level on the desktop microphone.
- Volume switch knob: Rotate to switch the speaker output level.
- PTT lock indicator [lock]: The indicator lights up red when the PTT lock is in the ON position, and no indicator lights up when the switch is in the OFF position.
- PTT button: Press and hold the PTT button and speak into the microphone to transmit. Release the PTT button to enter receive mode.
- PTT switch lock: Speak into the microphone and transmit continuously (transmission time is limited by the external device) after switching the button to ON and without pressing the PTT button. Switch the button to OFF to disable the continuous transmission function and receive after pressing PTT.
- Foot PTT button connector: Connect a foot PTT to the 3.5 mm jack to use the foot PTT; press and hold the foot PTT button and speak into the microphone; release the foot PTT and return to receive mode.
- RJ45 8pin network interface: external plug.
4. Connector Types
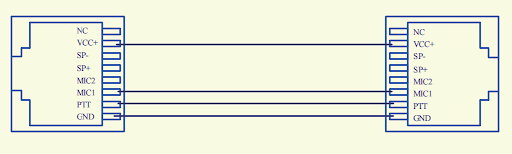
RJ45 and GP328PLUG
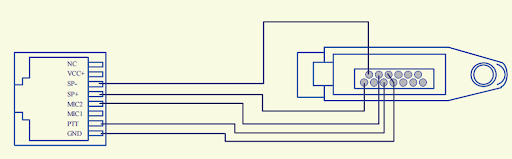
RJ45 and KENWOOD 2-Pin
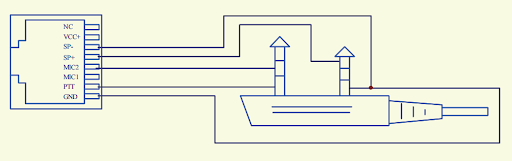
RJ45 to RJ45
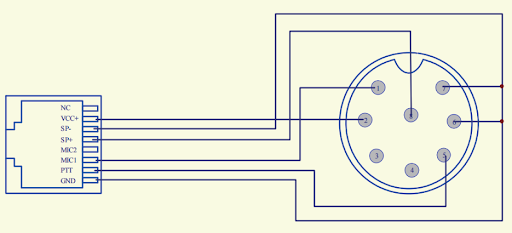
RJ45 to standard, round 8Pin connector
5. Technical Specification
|
Parameter |
Value |
|---|---|
|
Microphone Type |
Unidirectional electret condenser microphone (built-in preamplifier) |
|
Microphone Impedance |
2 kΩ |
|
Sensitivity |
-36±2 dB (0 dB=1 V/pa. 1kHz) |
|
Signal-to-Noise Ratio |
60 dB |
|
Cable Length |
Approx. 2 m |
|
Dimensions |
136 x 100 x 40 mm (does not include microphone assembly height) |
|
Weight |
Approx. 450 g |
Specifications in this manual are subject to change without notice or obligation.
Headset GST-BT
0. Unpack and Check Accessories
|
Item |
Quantity |
|---|---|
|
Bluetooth Headset GST-BT |
1 pc. |
|
Bluetooth Adapter |
1 pc. |
|
Replaceable Ear Tips |
2 pcs. |
|
Velcro Strap |
1 pc. |
|
Charging Cable |
1 pc. |
|
User Manual |
1 pc. |
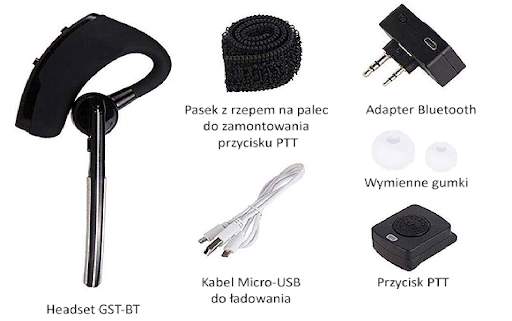
1. Kit Description
This product can be paired with two devices simultaneously. It features a built-in “PTT” (Push-To-Talk) button and has a noise reduction function. It allows simultaneous calls (in standby mode) and radio priority when the GST-BT headset is in phone call or media playback mode. When the intercom receives a signal, it will automatically switch to intercom call mode. After the intercom call ends, it will automatically return to phone call / media mode after 8 seconds.
When the GST-BT headset is initially connected to the intercom and you then want to pair it with a mobile phone, turn off the GST-BT headset and pair it with the mobile phone first. Once the headset successfully connects to the mobile phone, restart the GST-BT headset. It will automatically connect to both the intercom and the mobile phone.
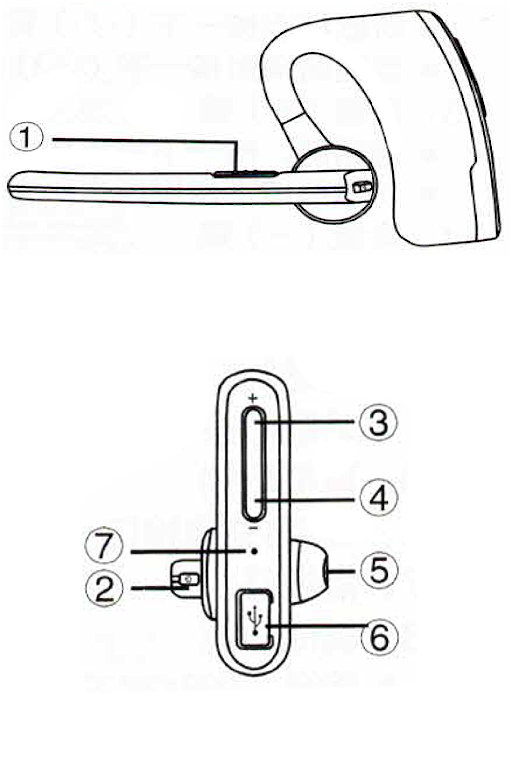
- “PTT” (Push-To-Talk) Button
- Power Button
- Press and hold the red button for 2 seconds to turn on. To turn off the GST-BT headset, press and hold the same button for 2 seconds.
- Press and hold the red power on/off button for 6 seconds to start Bluetooth pairing.
- Short press to pause and resume music playback.
- Short press to answer a phone call. Then short press again to end the call.
- Volume Up Button
- Short press the button to increase the volume.
- Press and hold for 2 seconds to go to the previous track.
- Volume Down Button
- Short press the button to decrease the volume.
- Press and hold for 2 seconds to go to the next track.
- Earbud
- Micro-USB Charging Port
- LED Indicator
More functions:
- Enable noise reduction function: press the power button and volume up button simultaneously (② + ③).
- Switch language: press the power button and volume up button simultaneously (② + ③).
- Delete paired devices (pairing reset): press the volume up button and volume down button simultaneously (③ + ④). If the operation is successful, you will hear a beep.
Wireless Bluetooth Adapter
0. Pairing the Bluetooth Adapter
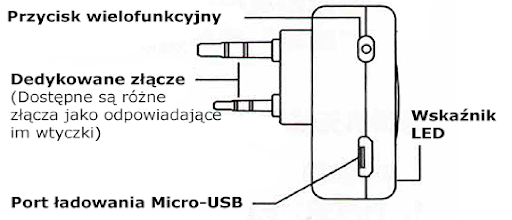
- Turning On / Off
- To turn on the adapter, long press the multi-function button for 2 seconds (the LED indicator will start flashing blue).
- To turn off the adapter, press and hold the multi-function button for 3 seconds (the LED indicator will start flashing red).
- Pairing
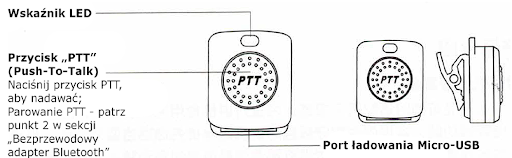
When the Bluetooth adapter is off, press and hold the multi-function button for approximately 7 seconds to enter pairing mode (the LED indicator will flash red and blue alternately):- To pair the wireless PTT button and the Bluetooth adapter, press and hold the PTT button on the wireless button for approx. 1 second. The red indicator on the Bluetooth adapter will disappear. This means that the wireless PTT button has been successfully paired with the Bluetooth adapter.
- To pair the Bluetooth adapter and the GST-BT headset (indicators on both devices will flash red and blue alternately), wait approximately 40 seconds (first pairing). When the indicators stop flashing and the indicator glows only blue, the GST-BT headset has been successfully paired with the Bluetooth adapter.
1. LED Indicator
- Blue indicator flashes slowly: power on, in standby mode.
- Blue indicator flashes quickly: Bluetooth connection has been lost; check if the GST-BT headset is turned on or is out of Bluetooth connection range.
- Red indicator glows steadily: device is transmitting. When transmission is complete, the red indicator will turn off.
- Low battery tips: the indicator flashes red in standby mode, indicating a low battery level. The battery should be charged.
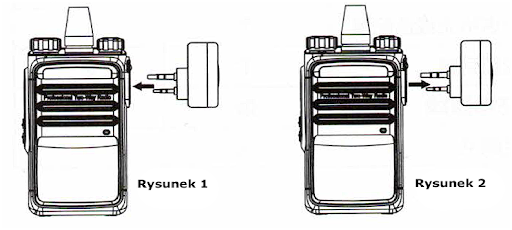
2. Installation / Removal
- Installation: Insert the adapter into the intercom port. (Figure 1)
- Removal: Disconnect the adapter from the intercom port. (Figure 2)
Wireless “PTT” (Push-To-Talk) Button