



Okayo WT-350
1. User Manual
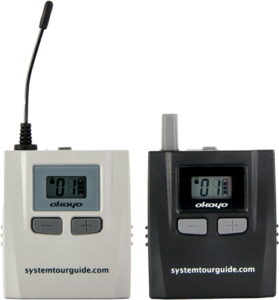
Transmitter (Tx) / Receiver (Rx)
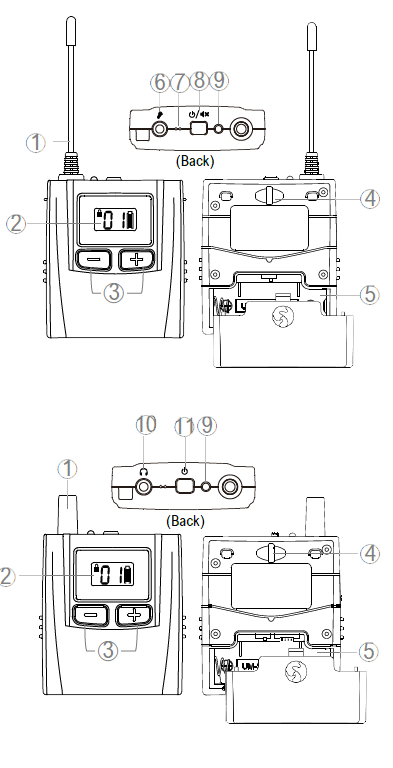
- Antenna
- Display
- +/- Button
- Lanyard Hole
- Battery Compartment (AA x 1)
- 3.5 mm Microphone Input (TS)
- Built-in Microphone
- Power / Mute Button
- Signal LED
- 3.5 mm Headphone Input (TRS)
- Power Button
2. Display
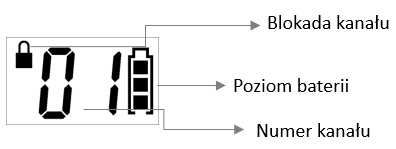
3. Low Battery
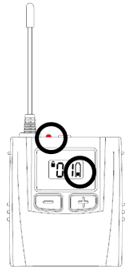
The battery should be replaced when the indicator lights up red and the battery symbol has only one bar.
4. LED Indicator
|
LED Status |
Transmitter |
Receiver |
|---|---|---|
|
Green |
Sufficient battery level |
|
|
Red |
Low battery level |
|
|
Solid |
Device is on |
Device is on and in a group |
|
Flashing |
Microphone muted |
- |
|
Off |
Device is off |
Device is on but out of group or device is off |
|
Flashing orange |
Channel synchronization in progress |
- |
5. Settings
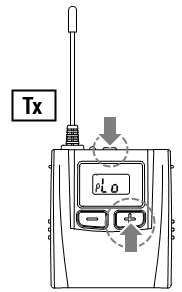
Transmitter (Tx)
Before use, adjust the transmitter settings to your preferences.
- Signal output power: Lo / Hi (Hi for higher signal output power)
- Microphone volume level (sensitivity): 1 / 2 / 3 (3 is maximum).
- Press and hold + and ⏻︎ simultaneously to turn on the transmitter.
- The signal output power screen will appear
 . Adjust using + or -, then press the power button ⏻︎ to confirm your selection and proceed to the next setting.
 - The microphone volume screen will then appear
 . Adjust the preferred volume using + or -. Confirm with the power button ⏻︎.
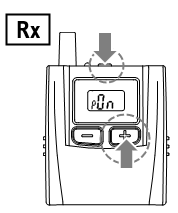
Receiver (Rx)
Select the correct receiver settings before use.
- Power saving mode: ON / OFF (automatic shutdown after 20 min of no Tx signal)
- Press and hold + and ⏻︎ simultaneously to turn on the receiver.
- The power saving mode screen will appear
 . Adjust using + or -. Confirm your selection by pressing the power button ⏻︎.
6. Remote Channel Synchronization (Remote Grouping)
This function is useful for quick grouping.
Step 1. Ensure that the transmitter's group channel has been selected before starting remote grouping.
Step 2. Press and hold both + and - buttons on the transmitter simultaneously for 5 seconds to initiate channel synchronization.
Step 3. On the transmitter, the orange LED indicator starts flashing. The transmitter sends a channel synchronization signal.
Step 4. Turn on the receivers and ensure that the same channel as on the transmitter appears on their screens.
Step 5. Press any button on the transmitter to complete group synchronization.
7. Operating Principles
Power On
Press and hold the power button ⏻︎ for 1 second to turn on the device.
Manually Select Your Channel
Press and hold the + and - buttons simultaneously for approximately 2 seconds until the 🔒︎ symbol disappears. Select your channel using the + or - buttons, wait 3 seconds, or confirm by pressing the power button ⏻︎.
Muting the Microphone on the Transmitter
A short press of the power button ⏻︎ will temporarily mute or unmute the microphone during a tour.
Adjusting Volume on the Receiver
Press + or - to set the receiver volume (level 1~15, default: 8) during a tour.
⚠ Note
Prolonged listening at high volume levels can cause hearing damage.
Receiver Power Saving
The receiver will automatically turn off (LED indicator is off) if there is no transmitter signal for 20 minutes.
Power Off
Press and hold the power button ⏻︎ for 2 seconds to turn off the device.
8. Specification
|
Parameter |
Value |
|---|---|
|
Oscillation Type |
PLL Synthesized Control OSC |
|
Frequency |
863~865 MHz |
|
Number of Channels |
16 |
|
Range |
~ 100 meters |
|
Operating Time |
~ 18 hours with alkaline battery |
|
Battery |
AA alkaline or Ni-MH battery x 1 |
|
Microphone/Headphone Jack |
3.5 mm |
|
Dimensions (W x H x Thickness) |
60 x 90 x 20 mm |
|
Weight |
70 g (with battery) |